
Post Processing ~ Documentation Improvements ~ Other Buildings In Progress ~ Painting
The Blacksmith building from the Kingdom of Thamarya Kickstarter is the 2nd installment into my goal of a complete set of the entire building collection. It has been slow but steady. Every building I make I feel as if I am always trying something new and pushing my knowledge and skills as a crafter and hobbyist. The absolute dream is that at the end of the year i’ll have an absolutely mind blowing tabletop to share. Although I’m behind in painting the population for the kingdom and the scatter terrain. One battle at a time.

As for the current status of the Blacksmith building I have assembled and almost completely (a few exceptions) primed the building as a whole. I have spent a little bit of time putting on paint for the walls of the building but definitely not enough to claim a base coat. If you would like to read more about how I printed, assembled and my overall experience with the Blacksmith building make sure you check out its main project page, Blacksmith: CastnPlay.
Even thogh the building is printed and assembled, one thing that has taken a significant amount of time is the post process and creative modifications done to the building itself.
Post Processing
First of all what does post processing even mean in regards to 3d printing? Since many of my readers do not 3D print I will explain. Post processing refers to any task that is put on a printed part to touch up, clean up, or enhance the piece. In some cases that would mean support removal, or resin printing clean up. In the situation for this post I am referring to any manual crafting I’ve done in order to truly enhance the building itself.
QuickLinks: Roof Gap Filling ~ Front Porch Pillars ~ Functional Forge ~ Magnetic Blacksmith Sign
Roof Gap Filling
The first step for cleaning up the assembly of the Blacksmith building was to fill the gaps of the roof. There were some difficulties in the assembly of the Roof due to printing an early beta version of the house (Read about it: Blacksmith Roof Assembly). As I had to cut and trim several of the pieces to ensure that they fit together. The gaps of the model showed more significantly than I would like. As a build I would like to own for years and years to come, I knew that the labor to clean it up was worth the time.
Since i’ve been experimenting with different putties, clays, and sculpting mediums for this type of task, i’ve opted to try Milliput this time around. Milliput is an epoxy putty which comes in two parts to sculpt and harden later on. In previous experimentation on a base I found that Milliput was much harder when cured than Green Stuff which I thought would be perfect for a building.


Overall I found Milliput easy to work with over large surfaces if I also introduce a bit of water to my tools and fingers. As you can obviously tell from the roof itself though, my sculpting skills are still a work in progress. The edges are not smooth and milliput filled in the gaps of the tiles at the bottom. I ended up using milliput on the top of the roof to fill the gaps as well as attempt to smooth the underside of the roof from imperfect filament sagging due to print orientation. I know that almost no one will ever see the underside of the roof but I’d know. I choose to attempt to fill in the roof underside rather than sanding or trimming because it was a large flat surface that would have taken way too much time to do along with the fact that the Milliput could strengthen the multiple pieces of the roof. I wasn’t too crazy worried about finish though because I could cut away harden Milliput I didn’t want or sand it down which is nice.
Please let me know if you have a better idea on sculpting material for this post process step. I am intending to try all sorts of mediums but always open to new ideas.
Front Porch Pillars
The front porch pillars were definitely one of my least favorite parts of the building. I do not know if it was due to my assembly of the house or its design but the pillars themselves were too short. In order to touch the roof they had to float off the ground and if glued to the base they would never support the roof. The second issue with the supports is that they never actually touched any other piece of the building in order to securely glue them into place.
When coming up with a solution I also factored in a few design constraints;
1) The interior has to be playable and roof easily removable. aka roof needs to sit flat on the tabletop.
2) The components of the building itself have to be durable both for storage as well as small children playing with them.
In order to fit design constraint number 1, I knew the pillars could not be glued to the roof as it would make roof removal clunky and not sit flat on the tabletop if removed. For the second constraint I decided to physically extend the stairs of the front porch to hold the pillars in place. To accomplish this I used small dowel rods to create a bit of structural strength and hold the pillars in the gap between the bottom step of the front stairs and the porch. Then using my newly acquired skills with Milliput and some freshly purchased metal sculpting tools I sculpted an expanded front staircase.


Overall I am extremely happy with the result and those pillars are very securely in place. I also learned that sculpting tools are an absolute necessary and I can’t believe I waited so long to purchase a set.
Functional Forge
One of the other major things I’ve been determined to do is include more is LED’s in my builds. I love the concept of having hidden lights in my builds or using them to really bring the table to life. This was the one build I chose to backtrack just for the occasion.
Since the interior of the building has a specific location for a forge and a 3d printable file for coals in that forge. I choose to drill out a hole for a standard tealight. Starting with one of the largest drill bits I could find, I drilled a pilot hole and then cut away material as I needed. Make sure you wear goggles if you ever try this! Cutting away the material was definitely difficult as I had to cut away at a seam between two pieces which had more solid walls but having a low infill of 5% material helped me as well. Since the edges were sharp I used Milliput again to soften the edges so people do not cut themselves pulling out the LED to turn it off. Note to future me: Cut out the tealight location digitally so it prints with the hole already cut away.


After I prepped the space and fit of the tea light I reprinted the coal file to be in transparent filament. This ironically is my first ever attempt at printing with Transparent filament even though the roll has been taunting me for over two years in my cabinet. Although I do not have a whole lot of experience with printing in transparent filament I am really pleased with the result. For the light itself I did a simple hole for the LED itself to sit in the printed coal file.

Now the next challenge is going to figure out how to paint the coals without turning this opaque. I’ll be sure to fill you in on what happens when I paint it.
Teaching Moment: For those not familiar with transparent filament for FDM printing. The process of fused deposition modeling (FDM) printing essentially melts down plastic through an extruder head which in turn recrystallizes into the the shape the 3d printing moves the nozzle. Due to this behavior it is extremely difficult to get a true transparent look in your 3d prints and the results are instead semi-transparent. To compensate for that people would ideally attempt to reduce the amount of layers or material that is printed to reduce the amount of recrystallization.
Analogy: Think of it as making a window of thousands of tiny window panes vs a window with only tens of window panes. It is easier to see out of the window with less window panes.
Magnetic Blacksmith Sign
Last but not least for this building I decided to magnetize the sign for the Blacksmith. This could make it so the building would appear like any building as well as improve storage capabilities. I am nervous about storing the building with the sign jutting out of it because I admit to not being hard on my models. I used 4×2 mm magnets and placed one in the hole of the building wall where the sign would go and one on the end of the sign. Overall these fit well but I do wish I drilled a hole into the wall so that way the sign was more sturdy.
This is definitely not fancy by any stretch of the imagination but if you want to do this the 4×2 mm magnet is a perfect fit!


Documentation Improvements
One also major thing I’ve done with the blacksmith project page this time around is to attempt to provide an assembly diagram for either print method of your choice. Since FDM printers have a larger print bed and are easily more capable of printing with large flat surfaces, the team at CastnPlay has reduced the total pieces to print for FDM models. As a result assembly, total number of pieces, and even part names could be different between FDM and Resin models.
I am still ironing out a way to improve the look of the graphic to articulate the difference but would love to hear what my readers think about the attempt to cater to the community since there is no guide to assembly of these buildings at this time.
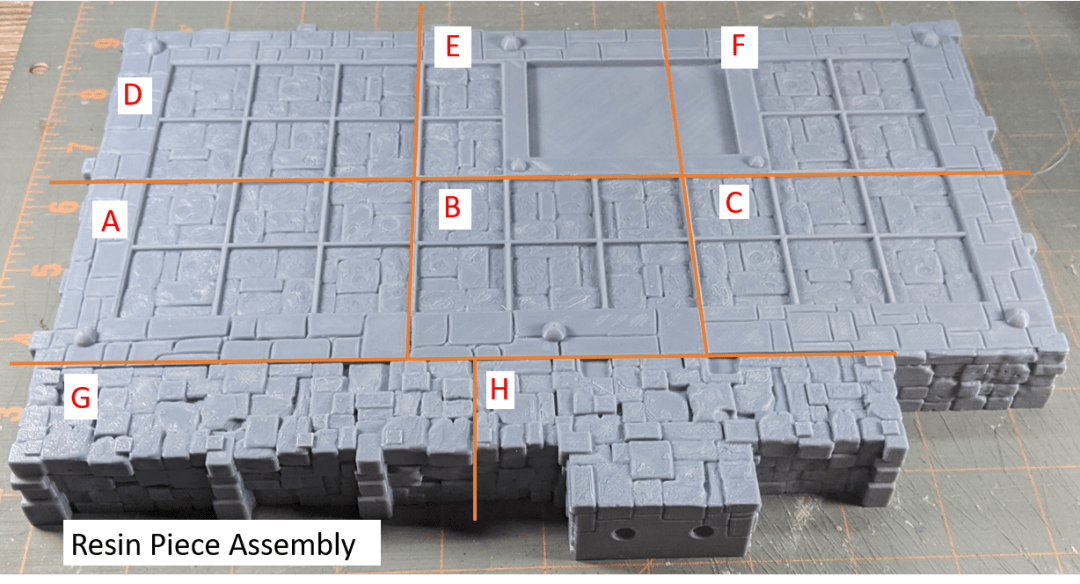

Also since others may be like me. I am also including a overlap or translation table so that way if you print in both FDM and Resin for the pieces of the buildings you know what pieces in the resin files would match what pieces in the FDM files. Is this easy to understand and read?

Other Buildings in Progress
The Blacksmith is not the only building i’ve been working extensively on over the last few months. I have successfully printed to completion not one but two Cottages from the Kingdom of Thamarya collection. I decided to create two variants for these buildings a two story and a three story. I am currently in progress of writing, updating and releasing the product page as well as a status update for the buildings like I’ve done for the Blacksmith.

General Store: This building is currently being actively printed. I started a while ago, got distracted, and am finally on pace to potentially finish printing this building this week.

On to Painting!
Definitely let me know in the comments below if you liked an idea or think I could have tried something different. I’m always looking for more ways to experiment.
As always. Happy Hobbying,
Carrie aka crazmadsci the Crazy Mad Scientist
2 thoughts on “Blacksmith Kingdom of Thamarya Status Update”