Last weekend a disaster struck. A massive majority of my miniature collection has come crashing to the ground thanks to the adventuresome behavior of my cat, Turtle. You see at the moment my miniatures are being housed in an old bedroom TV cabinet as I am working on “figuring out” an improved method of widespread storage. In reality I have been continuously making it worse by stacking an increasing number of boxes and containers on top of each other just waiting for the day something shakes the whole tower down.
Well that day happened. On Saturday I heard a large CRASH and was terrified it was my curious toddler. I go running and immediately feel two emotions. First I am absolutely relieved to find that no child or animal was hurt. Secondly I felt my heart sink to my stomach as I saw the devastation the laid before me.
Miniatures lay in pieces scattered over the floor as hundreds of models crashed on top of each other, into other boxes or just spread out. The largest damage of which is my painted miniatures of 2021. Over half of all models painted in the last year lay in pieces.
Some batch of models in pieces.The culprit! Turtle the Cat
Trying to Piece it Back Together
I then proceeded to spend a large portion of my time to see if I can glue as much of the minis together. While I was trying to piece much of my hardwork of 2021 I had an inner dialogue of problems and perhaps ways I can fix them and should focus on for 2022.
The surgical field, to glue models back together.Haggatha the NecromancerLizardman, Lost Adventures Vol 1Hill Giant, Lost Adventures Vol 1
Trying to Solve the Problems
Actually Utilizing My Storage Solutions
“Carrie, why in the world did you wait this long to try to organize your models?”
Voice in my head
You see this is actually ironic because last year I spent a long post series on organizing my collection & hobby space: Storage Wars. I even went as far to develop a new storage tray system for my models (Storage Wars: Part 3 Miniature Storage Trays). Yet in my haste towards the end of the year I did not fully utilize system. The biggest issues that I have is that I have no way to display or store models I’m using that are completed.
Solution: Actually utilize my storage solutions! Take the time to put models away. Find a way to store finished models safely or on display.
Experiment with New Materials
The harsh reality of it is that resin from 3D printing can be extremely brittle. Depending on the material used, duration of cure times, or even staying in storage exposed to UV light can increase this brittleness in your resin models & terrain. Towards the second half of last year I began to use harder resins which are more impact resistant making them more likely to just break rather than shatter. This was definitely noticeable in my Dwarven Frostgrave army printed mostly in 2020 rather than my husband’s necromancer undead army printed later 2021. When the newer models broke I could find most of them to try and glue back together. However some of the original resins used that were basic resins without additives such as ABS-Like or Hard were more likely to shatter rather than break. Let this be a testament on more durable resins being valuable! However in truth and with all the benefits of 3D printing the brittleness of the models definitely is a very strong negative about the 3D printing hobby. I had no reaper bone model damage, metal model damage and very little hard plastic model damage.
Solution: Prime all printed models to prevent more curing from storage & investigate and start a series of experiments with flexible resin additives to give models more give and capabilities to stay intact.
Begin Cataloging My Collection Again
Last year I started a database of my miniature collection as well as a visual catalog. While it is still a long way to go it is a start. One major downside to this is that in December I sold off a large portion of my collection and did not update my spreadsheet or visual. I need to go back through the list and update the data before I can continue to grow again.
Solution: Update the Spreadsheet, visual catalog and actually track the known vs unknown.
Conclusion
I recognize that finding better systems to account for ever curious toddlers and adventuresome creatures is a much needed thing. I wish I could have shelves to hold the things I love and have spent time on but just do not have the space for it in our home. If you have a precarious pile of models this is my warning to you to make it safer.
How do you keep your hard purchased or crafted items for your tabletop games safe? I keep telling myself that this is the moment where I learn my lesson, but only time will tell.
I am definitely riding the high from this year’s 2025 Nova open. And what a treat it has been to go to and see my friends. I always walk away full of inspiration, a bag full of goodies and a mind full of creative endeavors to do for next year. Heading to the event I…
Playing Bloodbowl is wacky and fun. But wouldn’t it be better with a fully fleshed out stadium to play in? Join my process of creating a 3D printed bloodbowl pitch.
When working on improving any skill or hobby, oftentimes it is hard to gauge personal growth. You can become so deeply focused in your task that having the capability to step back and gain a larger perspective is difficult. Or in some cases the improvement may be so small or subjective it is hard to determine any improvement at all. This can lead to frustration, lack of motivation or even burn out.
How can you to solve this problem?
Last January I set out to try to solve this issue. I painted a benchmark miniature figure so that I may judge my improvement over the course of one calendar year. This benchmark was at that time the very best I could do in painting a miniature. I set no time limit and poured myself into it. The primary goal was to test if I could see a before and after of how far I developed as a miniature painter.
So what is a benchmark?
Something that can be used as a way to judge the quality or level of other, similar things.
So in this situation I used the same model painted a year apart to test their different quality levels.
Setting the Baseline
Here is an image of the model painted January 2021. If you want to read more about my thoughts about it at the time and painting read the 2021 Benchmark Model.
2021 Benchmark Model: Dwarf
So the million dollar question, have I improved a year later?
Have Others Give Their Opinions
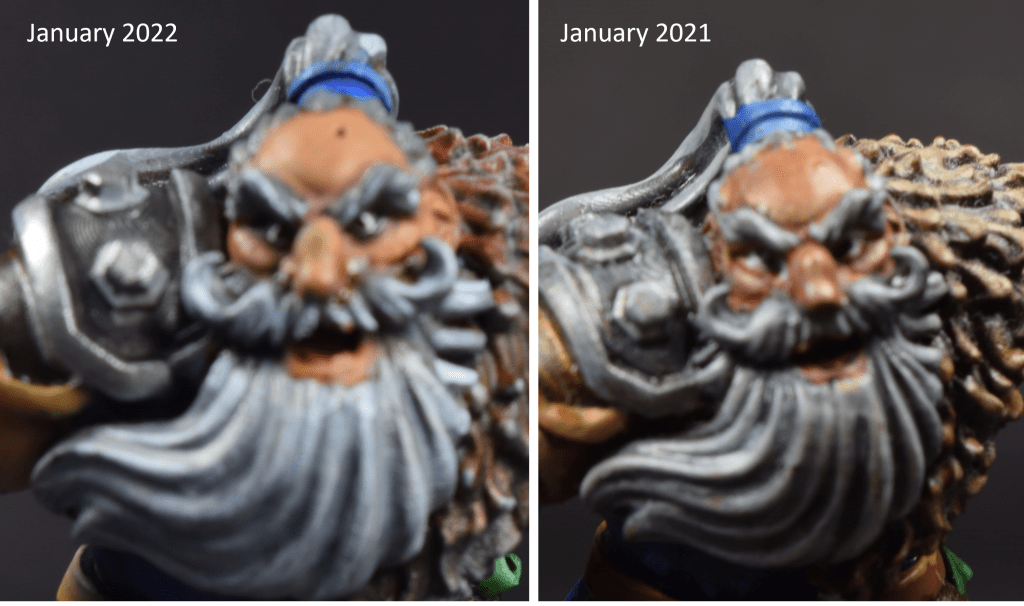
Left 2021 Benchmark, Right 2022 BenchmarkLeft 2021 Benchmark, Right 2022 Benchmark
When I finished painting this model last week I will admit to feeling a bit deflated. I attempted to focus on painting the new model using a similar paint scheme in hopes that the comparison should not be influenced over preferred color. However when I placed the paint brush down at the end I was not Wowed. I felt no immediate pride or even noticed any significance in difference of my model. In my mind I could only envision where I wanted to go with the model and yet didn’t have the skill (seeing only the flaws not the victories). I couldn’t step back and admire what I could accomplish in the today.
So I decided to ask for help to take a photo to my friends, family, and fellow members of the painting community. The question was simple. “Which model is the newer one and why?” Could people see my improvement where I could not? Could people actually see the areas in the hobby I desired to improve upon in that year?
The conclusion was simple. Every single person who guessed my old model vs my new model was correct. No matter their background or skill set there was not a single person who guessed was wrong. Even non-painters saw growth.
Here are some of the various pieces of feedback and comments I received from different platforms:
Basing is fancier, the skin is smoother. In general fewer visible brush strokes.
The metal looks more like metal, than “gray”. The skin looks more natural, and less glossy. The basework is more complex. The eyes look more natural too. Overall, just appears to be a higher quality paint job.
Both are better than my painting. They look great, but skin on the right looks way better.
Looks like smoother coats. The eyes are better. Cleaner paint work on the rims of the pauldrons. Just all around more attention to detail on it. Some blending on the cheek bones it looks like
The Consensus
Significant areas of improvement were the base of the model which was vocalized as was fancier, more adventurous, and more complex.
It was also noticeable on my improvement with skin & eyes. The skin did not have a glossy appearance (Nuln Oil has a gloss version by the way). Also the layering of my skin was better. My work at setting a baseline with skin using the Hill Giant last year really paid off here.
Lastly my metallics appeared to be better. Did not appear as a basic gray but had sharper lines and better brush control with edge highlighting.
However there was also a repeated opinion that it appears that I am also making a stylistic change. Moving away from washes in the beard and cloth perhaps took away from the contrast and did not push the highlights as much as I did a year ago. Check out the comments.
I feel like the right one has sharper lines and colors so my instinct is to go with that one being the more recent one, but it almost feels a bit like a stylistic choice between the rougher more blended palette and the sharper more distinct style
This comment also gave some feedback on potential improvements with washes which I absolutely agree with.
Looks to me like the one on the right is the more recent one. The one on the left you used more washes, the one on the right more highlighting. There are things about both that I like. With the washing, I’d say try and go a little less wet, you have a lot of the ‘coffee stains’ where your wash dried to the edges and makes your ‘creases’ a bit of a mess. Less paint on the brush. BTW, a wash that is dabbed on a paper towel till mostly dry is essentially a glaze technique which looks like you did on the right guys face, looks great! One thing I like about the wash is you maintained a lot of contrast. To tighten up your highlights, thin the paint, dab from brush, and do multiple passes if you have to. Overall, I like the composition and I think with just a few tweaks you’ll have some new things to explore.
My husband even agrees that the beard in particular he prefers on the old model than the new one. This is something that I need to go back and work on for sure.
More Detailed Comparision
One thing I absolutely forgot I did when I wrote the 2021 Benchmark write up is I included specific areas of desired growth. Listed below. Lets go through and see which ones I succeeded in.
Aspects of Desired Growth
Fur: Can I learn to paint fur better that it could even dictate the type of animal it comes from? Potential area to improve skills and knowledge in drybrushing?
Left 2022 fur, Right 2021 Fur
No Change. This aspect I consider no growth. They were essentially the same with contrast paint used on the newer model and more drybrushing and colors used on the older model. None scream as a better approach but rather just different approaches.
Armor: Methods and ways of painting True Metallics in miniature figures. Can I make armor shine? What are the different types of metals?
Left 2022 metal painting, Right 2021 Metal Painting
Success! This area was commented numerous times as significant areas of improvement. Use off better metallics along with selective use of washes and significant improvements on brush control & edge highlighting shine here.
Weapons: How do I make metallics & weapons look more battle worn and dinged?
Top 2021 sword, Bottom 2022 sword
Fail? (Just Different) I personally think that the weapons look less battle damaged in the new model vs the old. The use of the wash on the sword really helped give more of an aged aesthetic.
Skin: Starting completely from scratch. Largest desire is to have growth and variety in skin tone for my miniature collection.
Hair: Much like skin I have not put much effort into growing or researching this area in miniature painting.
Left painted face 2022, Right painted face 2021
Success and Fail. In this aspect my skin and eye are significantly improved but the contrast off the beard was preferred on the old model. I am proud of where I started with skin but want to research hair more.
Cloak: Layering and contrast. Can I improve my layering? Make smoother transitions in blending the layers? What methods & techniques work best for me?
Left painted cloak 2022, Right painted cloak 2021
Success. Improved blending was definitely an area off focus here. I worked quite a bit last year on glazing and next year hope to grow in wet blending. Also work towards improving those highlights.
Technical aspects I seek to improve upon
Improving Brush Control. Success
Zenethial Highlighting & Source Lighting, Success
Basing. Can I make the miniature tell a story, Success
Model appearance after basing2021 Benchmark Model Take 2 Primed via AirbrushAirbrushed Primed 2021 Benchmark Model
Adjacent Goals
Improve my miniature photography, Success
3D Printing the Figure
Can I improve the state of the print itself? Success
Methods to improve post process clean up, Success
Note I did break a hand/weapon joint and had to use green stuff to clean it up again. Success no breaks
Of all the other areas I wish to grow I definitely feel like I hit improvements on each single one. This is a really good feeling.
Final Photographs
Left 2022 Benchmark, Right 2021 BenchmarkLeft 2022 Benchmark, Right 2021 BenchmarkLeft 2022 Benchmark, Right 2021 BenchmarkLeft 2022 Benchmark, Right 2021 Benchmark
Paints Used
Not only did I improve in some painting skills, I also am happy that I have started a paint journal to keep track of paints used, notes, and thoughts during a project. Sometimes those notes are simple such as here.
Benchmark Model Paint JournalPaint Journal for Benchmark Model Page 2
Conclusion
I am super glad that I took the time to paint this model and do a benchmark test. Although I was disappointed the moment of completing the figure looking back only a few days I am excited about my growth in the hobby. This write up has also been immensely helpful to show me that I am indeed getting better.
One thing I definitely take for granted and need to articulate is the fact that along with improving my painting skill, I have sped up tremendously. While the original model was painted over 5 painting sessions this one was over 2. This is also an area of hobby growth.
I highly recommend a benchmark model if you ever feel like you are stagnant in your hobby or skill growth. This was a fun experiment and I am definitely going to be doing another one for this year and perhaps make it an annual thing. If you want a sneak peak as to what I’m working on make sure you follow me on Instagram.
Have you ever painted a benchmark? Can you see a difference? What should I focus on for the next year?
Thank you for sharing this journey with me. As always happy hobby.
I am definitely riding the high from this year’s 2025 Nova open. And what a treat it has been to go to and see my friends. I always walk away full of inspiration, a bag full of goodies and a mind full of creative endeavors to do for next year. Heading to the event I…
Playing Bloodbowl is wacky and fun. But wouldn’t it be better with a fully fleshed out stadium to play in? Join my process of creating a 3D printed bloodbowl pitch.
Last week marks a special milestone for me, One Year of Owning a Resin Printer. I can’t believe that I have only printed on my Phrozen Sonic Mini 4K for only a year because looking back on it, WOW have I accomplished a lot. While I printed my first resin miniature back in 2018, i’ve waited some time to have my own.
Since I have had a resin printer in my home for a year I thought i’d take this opportunity to share some of the questions I answered before jumping into this aspect of the 3D printing hobby and share some of my experiences.
My shiny resin printer ready to be played with right out of the box.
Backstory
Over the last two years, resin printing has absolutely exploded. Printing in your home has become significantly more affordable as well as product variety in both the printers and material.
When I started looking in the 3D printing hobby, entry resin printers started around $500 with average cost of resin $60 for 1 kg of resin. Now people can get into the hobby for less than $200 a printer with resin costing about $30-$40 a kg for average users. On top of that material resin has grown in water washable resin, tough resins, flexible resins, transparent resins and more. These were available in the past but the number of companies offering options and variable price points around the world have grown tremendously along with improvements in formulas.
Not only has the cost of resin printing and availability of products grown over time but the market is absolutely stuffed full of artists and there hasn’t been a better time to find model variety for your tabletop games, display painting, wargaming etc.
My Personal Goals & Criteria for a Resin Printer
Before jumping into resin printing I set rules and answered several questions before buying.
Budget: Around $250 Printing Usage: Primarily miniature figures and bits Size: Did not matter for me as I already owned a large volume printer with my Prusa Mk3s FDM printer Goals: To create model figures and things I haven’t been able to do well on my FDM printer. Also learn a new method & technology of 3D printing
Narrowing Down the List
In summer of 2020 when I was researching what resin 3D printer to buy a few major milestones in resin printing development were happening for the 3D community.
Large Format printers were hitting the marketplace for the the everyday hobbyist. These include products like the Elegoo Saturn which is almost 3 times larger in volume than the Elegoo Mars 2. Why is this important?
Faster printing: Since the build plate is larger. Hobbyists can make more objects at a single time making it capable of producing more miniatures per print in the same amount of time.
Print Larger Objects: Due to the larger volume in both the print bed but also the Z-axis. People can now print buildings and larger monsters easier with fewer cuts and keys.
Monochrome Screens were being released as a new and improved screen for resin printing. Example model the Phrozen Sonic Mini 4K. Essentially each monochrome screen aimed to project more blue light at 405 mm wavelengths which is the light used in the photochemical reaction of resin printing. This is an improvement over the standard LCD screen with equivalent light sources of Red, Yellow, Blue. Why is this important?
Faster Printing. Since there is a higher light efficiency projecting from the screen. Print exposure times go significantly down meaning it takes less time to cure each layer of resin and therefore producing a miniature faster.
Longer ScreenLife Spans: since the screen is emitting light more efficiently, it is therefore on for shorter intervals and will last longer. This saves the consumer more money in the long run in having to replace the screen. Marketing of monochrome printers say the lifespan can be 4 times longer than its LCD counterpart but only time will tell if that is true.
Since the evolution of 3D printing would undoubtedly result in faster printing the question still remained. Did I prefer a larger printing volume or higher resolution printer with a longer life span?
You might be asking “what do you mean higher resolution printer?” Glad you asked resin printing is based on the resolution of the pixel density of the screen and not just the resolution of the screen. Therefore if a printer has the same 4K resolution but one has a larger print volume the XY resolution of that printer would less than a 4K resolution small printer. As you might have guessed from reading my blog already I decided upon the Phrozen Sonic Mini 4K which was a 35 micron XY resolution printer vs the Elegoo Saturn with a 50 micron XY resolution.
My Resin Printer in its new home
At that time the Phrozen sonic mini 4K had the best marketed XY resolution ever to hit the hobbyist market. Currently it is matched with the Elegoo Mars 3 at 35 microns and beaten by the Epax X1-4K at 32 microns. Due to it being one of the first of its kind I did go slightly over my budget (approximately $300 early bird special) and jumped on the 1st wave of orders. I was absolutely thrilled to begin this new chapter of my printing journey.
Safety Concerns
One of the largest reasons why I waited so long to get into resin printing was not having a safe space for harmful fumes while printing as well as having a working space for resin away from my small curious and ever growing child. The safety concerns and studies regarding resin printing are vast and too big for discussion today but let me know in the comments if you wish for me to go into it more.
Even though I did spend roughly a month printing out of an old wooden wardrobe. My partner and I built an enclosure to become the future home and current home of both printers, their materials, and tools needed while venting out of the house.
Once I got the printer, the setup, I set to work.
My 3D Printing Enclosure
Lessons Learned
Admitting my Stubbornness
Much like the excitement of starting 3D printing, resin printing completely opened a whole new world for me. While i’ll always be an advocate of FDM printing and consider there to still be a place for filament printed miniatures. I admit I absolutely prefer resin printed miniatures over FDM. I am without a doubt someone who will “Fight” others to say you can print tabletop standard in FDM but resin miniatures are leaps and bounds better in quality with less time committed than FDM.
Resin (left) vs FDM (right) of a jaill cell
Troubleshooting & Getting Started
When in doubt relevel your print bed. This is the cause of a significant vast majority of 3D printing issues for resin and unfortunately takes practice.
Also factory settings or even other peoples settings are not the best print settings for your printing environment and printer. Resin printing can be more temperamental than FDM so just sharing of print profiles does not work as easily. use these as recommendations to start from and run many calibrations.
Avoid Being a First Adopter
I now vow to avoid being a first adopter to a printer in the future. As one of the first people to own a Phrozen Sonic Mini 4K I absolutely love my printer BUT it isn’t perfect. What i’ve learned the hard way is that printers come out so quickly in-depth quality assurance is not always the case. Thankfully the model has improved over time for new owners purchasing the mini 4K. I’ve most nortiously struggled with my z-axis and issues associated with it such as banding and locking into place.
For the future i’ll wait a year or so before buying into a printer and let others pioneer the path. Being a mom of young kids I do not have the time anymore for such indepth troubleshooting.
First Prints
To start off printing I jumped right in and printed my absolute favorite monster the Owlbear. This baby owlbear is made by Manuel Boria and is one of the models in his welcome pack for joining his patreon. There are 3 in this set and immediately I was blown away by the detail of the sculpt with the tiny paws, fur texture and even cute eyes. Also looking back i’ve realized that i’ve also significantly improved my miniature photography skills.
Most Failures & Most Expensive Printing
I’ll never forget the hard hard lesson of knowing how much resin you should put into your printing vat. I must have failed about 4 times on the top leaves portion of the Heartwood Treant by Lost Adventures Co. Each failure was around $6 an attempt, ouch. This is by far now the most “expensive” model in my collection to print because of it.
Favorite Model
My absolutely favorite model printed to date was one I least expected the Graveyard Golem. Man does this figure have some incredible character. Much like I describe on the write up for printing this model I did not expect to fall in love with the model like I did. However the render of the figure did not do it justice for all the detail and storytelling found on the figure. I can’t wait to paint this!
Conclusions
Overall resin printing has not only really enhanced my 3D printing experience but in general has really motivated and inspired me to paint more. I truly do not think I was fully into the hobby as a “miniature painter” but after being able to print incredibly detailed sculpts and bring ideas to life it absolutely has changed me. I still consider myself new as a miniature painter and attempted to grow but have completely jumped into the hobby space.
Over the course of the last year i’ve learned a lot, grown a lot and have even recently joined the ranks of doing professional 3D printing support work. I am working diligently to bring much of my collective knowledge and reference material to life in a brand new “Printing Section” of the website. This section will contain, how to get started, troubleshooting, FAQ, tools and materials and more.
If you are on the fence of jumping into 3D printing i’d say it is absolutely worth it and there couldn’t be a better time to jump in the hobby. Have questions? Don’t hesitate to ask below as I’m always willing to help in your journey.
Are you working on anything special? Do you print miniatures or are thinking about it? Let me know in the comments.
As always Happy Crafting, Carrie aka crazmadsci the Crazy Mad Scientist.
Now for the seriously overdue conclusion to my Frostgrave series. I truly do not know where to begin, I’ve spent the last few weeks ruminating on how to articulate the experience and journey. In short it has caused some serious writers block.
Its been an absolutely wild ride. I started this project at the end of July with the quest towards an epic day of gaming and playing Frostgrave with my wonderful husband. Over the course of the past two months I’ve been tirelessly planning, printing, and painting as much as I could to truly bring a terrain dense and immersive game day. This was to accomplish two primary goals.
Try to overcome some of the downfalls from truly enjoying the game in our first few games from February which I discuss in Frostgrave Beginnings.
Due to the lack of terrain the game was significantly overpowered towards ranged attacks which reduced the fun of the game for me and really felt tremendously unbalanced as a game. Conclusion Learned: Yes increased terrain does significantly reduce the power of ranged combatants and really make things fun for all warband members.
I really needed a day to bond with my best friend which wasn’t just about our kids.
If those of you do not know we added another member to our crazy family four months ago and of course newborns can take a serious chunk of time out of your schedule. On top of that, due to Covid it has been incredibly difficult to have a date night or get out of the house. So the result was to find a baby sitter to watch the kids and be able to have a day of action filled gaming. As we do not currently have an active Tabletop group I was sorely missing being able to play and is a big piece of things we enjoy doing together. This was something that I could plan in advance and really get hyped about with him.
Overall I think these goals were accomplished. Now before I get into it more lets check out a few of the action shots.
Game One: Scenario Mausoleum
Doing what Archers do
Necromancer Apprentice
Random Encounters
Great use of scatter terrain
Necromancer Warband invading
Because someone wanted treasure on top
Who will get the 4th treasure
Scenario: The Mausoleum
Our first game consisted of playing one of the very first scenarios you read in the core rule book for Frostgrave the Mausoleum. This scenario requires two things; a mausoleum and skeletons.
The mausoleum is placed in the center of the board and has 4 sides with doors on each side. There are four treasures on each of the corners of the mausoleum and two placed by players within nine inches of the mausoleum. Of course Mr. Crazy had to place a treasure on the very top of the mausoleum to climb and get to while I placed my extra on a stack of barrels which also had to be climbed (or a well aimed Telekinesis spell). The added features about the scenario is the fact that a skeleton will come out of a random door at the end of a turn along with the monster rolls when treasure was picked up and we added the optional monster encounter rules. This of course lead to a growing danger of more and more monsters as you started to dwindle in warband members.
Overall it was a great and very close game. Mr. Crazy shut down my Sigilist really soundless with Curse and Plague of Insects making it almost impossible to cast any spell. My wardog Yippers was the real MVP and killed almost half of his warband in protecting my people trying to get the treasure. In the end I captured 3 treasures while he only captured 2 with one left on the board swarmed by monsters and unable to be retrieved.
Scenario: The Keep
For game number two we played the scenario the Keep. This story sets up with four magical discs which hold treasure but could magically teleport to a random one of the four. When a player tries to pick up the treasure you would teleport. What made this game interesting is the fact that you could potentially teleport into the enemy own disc and suddenly it becomes incredibly difficult to run away.
This game I really loved the set up of the discs and usage of the ruins from Hagglethorn Hollow. However I did find some areas too clustered for good movement. The more open area allowed for significantly more movement and sometimes advantage for team Necromancer and made my Sigilist warband only transverse less than 1/4th of the board. I definitely feel as if I swung to far in density. But you never know until you try right?
Conclusion of a Major Project
While I of course didn’t complete every goal I set out to accomplish in this endeavor, I’m incredibly thrilled in what I have accomplished. Ironically during the course of this project I have been constantly reminded by friends and family that I am incapable of doing anything halfway. So to not even start painting pieces of terrain or even prime in some cases definitely bothered me. However there was an indescribable feeling of satisfaction and excitement sitting down at that table after all that time. Knowing you put in so much time and effort and seeing the fruit of your labor and enjoying it for a game is why I started the hobby in the first place.
Overall project and experience are definitely going to end up being a hobby highlight for the year. I had so much fun, my cheeks hurt from smiling for hours afterwards. It felt incredible to have things to plan for and talk about moving.
The Highs
Printing Almost every single piece of terrain 3D printed on this map was created in the 2021 year (exception of the Mausoleum in the center). Approximately 80% of the terrain was made in a two month span August – September 2021. Some ruined buildings and pillars were made earlier in the year.
100% of this Battle Mat and our Warbands are 3D Printed! Note some random encounter monsters are manufactured miniatures, mostly reaper.
Battle Mat Usage of Scatter Terrain was 100% a game changer for me and fantastic. I loved having treasure stacked on top of a bunch of barrels requiring you to climb up to them (Or use telekinesis) along with having figures standing on crates to get a better vantage point for shooting. There is so much versatility in spells and cover and highly recommend putting in the time for a collection of scatter terrain.
Painting Lastly the largest high is that every single member of our warbands had paint on it. They were not 100% finished to my typical standards but having painted minis on the table was an incredible feeling. In the end I painted a record of 19 models in the two month span and of course took the majority of my painting time.
All painted models for August and September
The feeling of community. During this project I really bonded and shared what I do and what I enjoy with not only my husband but also friends. They cheered me on and even helped in the painting of some terrain and models. The tabletop crafting and miniature painting hobby can sometimes be incredibly lonely and it was an absolute treat to be able to have others apart of my journey. If you have been following along with me on this project I thank you for cheering me on.
The Lows
I of course was disappointed that I did not have the time to paint everything. Yes I know I was being overly ambitious but a girl can dream. At least you can get a glimpse of the colored filament I was trying to use up, I almost always paint what I print (or aspire to) so colored filament doesn’t matter to me.
It also strangely bothered me that I did not have a 3 foot by 3 foot battle mat and I used green construction paper to flush it out. I also do not own a frost or snow themed battle mat (yet) as the 2 foot x 3 foot mat I bought is coming later in the year from a Kickstarter by EC3D Dungeonmats who made the current dungeon mat I am using. I love the double sided mats so much I decided to back their latest kickstarter to get a frost one.
I didn’t fit in all the aspects of map layout design I really wanted to accomplish. I worked hard on a bridge and river to attempt to incorporate water into my board but in the end it did not make sense space wise for the games. I did spend a good deal of time on that and am definitely disappointed it didn’t make it in. This resulted in all the research I did in my map design to be kinda thrown out the window but did turn out to be a fun table in the end regardless.
Hobby burn out. Working so hard on so many things seriously have taken a toll on my hobby printing and painting since game day. It was incredibly difficult to keep up with all the various things I was producing, their hobby status, what I was missing and keeping it all organized. I normally am great with creating pages and print logs for every single thing but in the mad Hussle to get stuff on the table I have yet to compile the data for better searching of what is out there in the community. This is definitely something I plan to fix in the future.
Since the conclusion of this project I haven’t dove seriously into anything yet for personal hobby time but have officially started working professionally in the 3D printing space. Don’t worry i’ll share more in the time to come.
What’s Next in Frostgrave?
The Frostgrave series on the site has truly been something special for me and obviously based on comments and feedback a project others can relate with. So I am opening this up to a group conversation and am curious what you think you would like to see and read.
Would you like to follow on our adventures with Battle Reports of our games?
Would a useful section of the site specific for Frostgrave be useful on images and tools of how some of the rules work? (A birth of a game section for the site)
A quest to paint every miniature in the bestiary?
Reviews of supplements and expansions? What is in them, what they provide
Simplified “what you need to play?” so other new players can join in the fun.
Or perhaps should I start and prep for a different game in the Joseph Mccullough collection such as Ghost of the Archipelago, Ranges of Shadowdeep, Stargrave.
Let me know!
As always happy hobby and have a wonderful day.
Cheers, Carrie, Crazmadsci the Crazy mad scientist
We are over half way through the timeline of my Frostgrave project. So far it has been a wild ride and to summarize my feelings over the last two weeks, overwhelmed. I’ve spent a little bit over a month on my most ambitious terrain and miniature project to date. Its going to be extremely close to succeeding my goals and reaching the deadline of creating a 3×3 foot epic and immersive war gaming board to play with my husband. It has been hard to schedule games lately and this will be a real treat. If you want to follow along my journey from the beginning. Start at the Frostgrave Beginnings post of this series.
Since we are over the halfway mark lets reflect on my current project status. It has been two weeks since my last project update and I have quite a bit to talk about so buckle up.
Laying Out the Map
Since this project has so many moving pieces, I definitely began to loose track of what I had and what I needed. I couldn’t figure out what should be in the queue to print and produce, what was missing, and needed to visualize what our gameboard would look like. So like any person I decided to play with my toys and set it up as if I would play today.
Using some 12 inch x 12 inch colored construction paper I laid out my total desired board spacing to best visualize not only how much space a section of terrain will take but also if a region would “ooze” into other quadrants. Overall i’d call the experiment a success but my tiny assistant, did start tearing apart paper as you might be able to tell from the pictures.
Overall i think i’m beginning to have enough large terrain to be satisfied but still want one or two more feature pieces that really stand out along with significantly more verticality in movement such as bridges, planks and more. I’m also going to incorporate scatter terrain such as crates and barrels to provide more cityscape clutter for line of sight breakers and cover.
Frostgrave Test Layouts
Printing Status Update
Since this project began I do not think my 3D printer has truly stopped producing more models and figures. I tend to have a few mass production cycles for the year and this for sure is one of them. So lets list the highlights of pieces made (definitely not all).
Infinite Dimensions Modular Rivers
While I only have a few pieces printed of the entire set of available pieces I do have enough printed to cross a section of our board. I am calling these pieces “good enough” to play with without producing more and are currently in progress on the painting bench.
I definitely have high goals and ambitions for river tiles and currently consider these more experimental pieces. I want to use some water effects, maybe stone pebble the river a bit, along with perhaps some grass? I know its the game of Frostgrave but by having some greenery on these would give me the best versatility for my tabletop as a whole. Maybe the Frozen City is showing signs of thaw?
Printable Scenery Graveyard Walls
These walls come from the Shadowfey Kickstarter of printable scenery. I decided upon using these over the options presented in Frostgrave part 2: Map Design. I am so glad that we choose this one as the walls themselves are taller than I anticipated and will be great for unique sections and break a decent portion of line of sight.
My wonderful husband has decided to help me and worked on these. The really wanted to try unique choices with orange stones and the white pillars and tombstones match the aesthetic of the original mausoleum.
Hagglethorn Hollow
I am currently in the process of printing the Hagglethorn Hollow ruins and some of the ruined buildings. Although difficult to see these ruins scream character and are perfect for play with a variation of verticality, windows, places to take cover, and places to add crosswalks and bridges.
The biggest thing i’m going to have to decide is if I should paint them a classic gray color or stay more true to the Hagglethorn Hollow color scheme (shown below). What do you think?
Hagglethorn Hollow Ruins Product Image
Printable Scenery Rope Bridge, Ladder, Stairs, and Gangways
Since laying out the models I had on my tabletop I’ve started to begin printing more pieces that would connect buildings and terrain in multiple story play.
While this is only a small portion of what I want to print I plan on making more and painting up these pieces.
I’m sure I’ve printed other things in the last two weeks on this project but it has honestly been hard to keep up with all the moving pieces. Also since so much of my hobby is printing in general I doubt I’d ever be truly done with printing stuff for my tabletop.
Graveyard Almost Complete
With the completion of painting the graveyard walls the graveyard feature piece for our Mausoleum scenario is almost complete. While some pieces like tombstones only are primed the whole area is just screaming for a game day. I’m so thrilled with how much fun it all looks and I even finished painting the Zombie set from Lost Adventures Volume 1. I was testing different skintones for what I wanted to use for the Zombie thugs for the Necromancer Warband.
It takes a Village
Last week I definitely suffered from the beginnings of feeling overwhelmed and hobby fatigue with how much i’ve produced and needed to paint. However at that time my wonderful husband offered to have a painting date night when all the kids went to bed (with a cat supervisor). What an incredible blast it was to share my hobby joy with him again. He had so much fun he even painted all days that weekend even on nights where I was too tired to paint. He is not someone who paints often but finds joy and pride in anything he gets done and ends up on the table. This is one of the most perfect of examples of sharing games and crafting with others and the joy it brings. I’ve greatly missed crafting with others and sharing the joy of experimentation and color choice. Also I really love seeing the color choices and techniques others use as they are different from my own.
In the last few days as well I had the incredible opportunity to teach a lifelong friend how to paint miniatures. I had no idea that he has always dreamt of trying to paint minis so I handed him some of my sigilist warband to try. We only got to spend a little bit of time together but he helped me start to basecoat my thugs and crossbowmen. I hope that I have corrupted him into joining the ranks to miniature painting so we can meet up and play games together. I still haven’t decided if i’m going to send him a care package in the mail of 3D printed models to kickstart his collection.
This Frostgrave project has become something truly special this year. My friends and family have been cheering me on and following along on my instagram as well as everyone reading here, so thank you. I have appreciated all the support and when I started to feel a lull in motivation i’ve been so surprised who offers to help or mention how motivating it has been for them.
Can I Make My Deadline?
For the goal of building my gameboard for Frostgrave I am well on my way to have all the terrain pieces I want to really make it a fantastic and fun experience . This will also work on improving some of my previous frustrations from past games.
My secondary goal of having everything painted for gameday will be cutting it really close. I would say that this goal of having all the terrain and miniatures painted will hinge on this upcoming week. You see i’m traveling back home to see my family to get some much needed vacation time in as well as celebrate the life of my grandfather who has been my inspiration in gaming. He will always have the title as one of my largest influences in my life to make me a gamer at heart. That along with my love with fantasy books.
In order to make this deadline I have packed some hobby stuff, perhaps too much paint and am working on using some of my time to paint on the road. I also bringing the warbands as well as scatter terrain and various pieces. Handsome hubs has still really enjoyed helping me so am bringing plenty to give him options and give him inspiration while trying to knock out my most time consuming pieces the miniatures. Stay tuned next week and find out how much I’ve accomplished. My goal would be to have at least my warband miniatures painted but time will tell.
Whats Next?
We are coming down to the wire and although I almost completely lost all momentum my friends and family have really come through in supporting my hobby which has felt incredible. Even a few have shown interest in playing. Maybe i’ll work towards expansion to a 4×4 board and more warbands for Christmas with a complete bestiary for a mega game with 4 to 5 players.
So far setting this deadline and chronicling the process has been an incredible motivator as well. The blog has been such a fun addition to my tabletop crafting hobby this year and so glad I finally started it. I still really want to add up all the data on materials, product sourcing, time printing etc to give people perspective as to how long or how much certain things take before the big game day. Maybe i’ll get some writing in as well this week.
What do you guys think? Think I can make my goals? Have you set a goal for yourself? Post, comment down below.
For 2021, I decided to paint a “Benchmark” of my skill growth for the year. The goal is to see the before and after of how I have developed as a painter. This year I decided to paint a model from the Hold my Dwarf kickstarter set. This duel wielding swordsman, from the Solider Set 5 collection, contains several aspects on what I really want to focus and improve upon on for the year. The areas of desired growth and questions I ask myself are listed below.
At the end of the year I will print another version of the model and paint a new model and talk about my personal growth. I am interested and excited to see where this experiment goes.
Aspects of Desired Growth
Fur: Can I learn to paint fur better that it could even dictate the type of animal it comes from? Potential area to improve skills and knowledge in drybrushing?
Armor: Methods and ways of painting True Metallics in miniature figures. Can I make armor shine? What are the different types of metals?
Weapons: How do I make metallics & weapons look more battle worn and dinged?
Skin: Starting completely from scratch. Largest desire is to have growth and variety in skin tone for my miniature collection.
Hair: Much like skin I have not put much effort into growing or researching this area in miniature painting.
Clock: Layering and contrast. Can I improve my layering? Make smoother transitions in blending the layers? What methods & techniques work best for me?
Technical aspects I seek to improve upon
Improving Brush Control
Zenethial Highlighting & Source LIghting
Basing. Can I make the miniature tell a story
Adjacent Goals
Improve my miniature photography.
3D Printing the Figure
Can I improve the state of the print itself?
Methods to improve post process clean up
Note I did break a hand/weapon joint and had to use green stuff to clean it up again
Progress Photographs
Final Photographs
Overall I am happy and satisfied with the display of my skill for this model. I have several things that I am frustrated on such as lack of choice in hair color and knowledge to create better more defined skin. I also would like to learn how to do gems/crystals for the sword hilt. I am really happy with the little detail in the green pouch and have received several comments about the swords being a key point of enjoyment.
One interesting comment which I think could lead to a great study or discussion on personal preference was the feeling of the figure being too “clean” as in not adventure worn enough. Adding dirt and grime to the model could give this dwarf a more warrior feel.
Paints Used
Also apparently as a goal for the year I am going to improve my formatting on documentation of paints used. I mean this is a thread on improvement right?
Continue reading to see how I grew in miniature painting a year later!
So guys I painted a thing! My very first model of 2021 has been completed. Although I started it at the end of 2020 I am counting this in the 2021 model count. I printed and painted the Purple worm from Fat Dragon Games. I absolutely fell in love with the model and really wanted to try my hand at glazing as a paint technique. I still have a ton to learn but overall am really happy with the result. This model I also thought would be a great model to practice on improving my layering as there is so much surface area of the same color to really try to hone my skill in that area. I did not have to worry about accidently bumping paint into fine details due to its simplicity.
Notable Achievements/Proud Moments of painting this model:
Largest model ever painted to date and not terrain. All previous models have been medium to large monsters.
First model painted to completion in 2021
First model where I attempted to glaze
First model using Vallejo Earth Ground texture.
Unlike other models I did put a lot of thought and research into the model. For more information on the mentality and evolution I took to paint this model follow along below. Otherwise check out the final product. Let me know what you think.
Printing the Figure
This model I 3D printed on my Prusa mk3s of which you can find the print log here. It is labeled as a “Giant Worm” as the Purple Worm name is a license and unique copyright to Wizards of the Coast Dungeon and Dragons.
Above is the graphical images of concept art of the Purple Worm from all 5 monster manuals going from most recent to oldest left to right, top to bottom. Image credit goes to the WOTC Monster Manuals.
Price Comparison of Printed vs Purchased Models
Overall there are 2 primary and most popular models that I could find of a Purple Worm on the market. One created by D&D Icons of the Realm: Fangs and Talons – Purple Worm (~$50) and the other Reaper Miniatures- Bones Goremaw ($29.99). Since the Icons of the Realm figures are found with collectible boxes and not guaranteed the price of that model is around $50 (found on Miniature Market). Due to its higher price Purple Worms are commonly crafted by hand as there are plenty of guides online.
However if I were to buy the STL from Dragonlock Miniatures ($2.49) and 3D print today ($1.94) for material cost. Total personal cost of this miniature is approximately $4.43. This makes this model cost 85.3% cheaper than the cheapest competitor, the Goremaw model, not including shipping. Overall i’d say 3d printing is amazing.
Monster Research
When attempting to figure out my goals in painting this project I set out and did some home work reading up on the model and most notably listening to YouTube video for Purple Worm lore. This was fascinating and gave me so many ideas that I applied while painting this model.
Based on the description of the monster. The Purple Worm is of course purple in color with a pale yellow underbelly. Its sides have hard crests and actually has a paralytic stinger in its tail (not shown in model). It is thought that the worm darkens as it ages making the deepest of purple marking an extremely old and terrifying creature to encounter. The worm is actually a relative of an aquatic monster and has a slimly skin giving it a shine. Part of the reason why the worm is purple is due to the valuable purple blood that courses though its body.
Painting Research
Also as a beginner painter I was curious how or what methods were utilized in painting Purple Worm models. Although at the time I found a picture of the model painted on the Dragonlock & Dragonbite 3D Printers facebook group I wanted inspiration. Overall I found 3 youtube videos that I found interested and gleaned various pieces of information from each. The largest downside is that due to the size of the model a lot of the painting is done by airbrush which I don’t have
Picture of printed Purple Worm/Giant Worm model from Fat Dragon Games
My poor attempt at zenithal highlighting. The idea was that since the monster was an underground creature the light source would most likely occur from a poor adventurer holding a torch. So instead of the highlight of color being from the top down i’d come from the bottom up. It is a great idea that I really enjoyed but do not feel like I captured that mentality enough.
Colors Added:
Base coat Daemonette Hide Citadel.
Base coated Battlefield Brown for base.
Worm Spikes are Vallejo Game Color Earth
1st attempt at Glazing using Liquitex Glazing medium and starting ratio around 4:1 glaze to paint. Integrating advice from Miniac’s youtube on glazing and Vince Venturella’s on glazing.
Starting a glaze of Heavy Violet on top of Daemonette Hide left a noticeable glossy texture to figure which in the case of this model works fine but is concerning for the future.
Continuing the glazing attempt I added Hexed Lichen from Vallejo Game Color to place on the top portion of the scales. Along with a top coat of Oozing purple from Army painter. The focus was to lighten the effect from the bottom of the plate having less paint moving upwards.
Adding a few dots of Pink Horror also added some extra pop around the spikes.
I proceeded to go back and forth adding darker and lighter in attempt to smooth out the noticeable layers to make an easier transition.
The mouth started with Rhinox Hide mixed with Scarlet Red to give a dark color of the mouth. Proceeded by a layer of scarlet red and pink horror as a top layer.
Using a combination of experimentation of several colors and layers helped build up the multi layered process of the belly. So much so I do not have an accurate color order of the belly. The overall goal was to leave the recesses of the model with the purple underbelly to indicate that you could see the blood veins of the model to match the lore.
Using my favorite process of painting bones I used that for the teeth, spikes and tips of the belly spikes.
I even experimented with the thought process of having rocks “fly” or explode out of the base as you can see from my tack and hot glue testing. Overall I did not fall in love with the method and opted to just do a plain ground base.
Future experimentation on the exploding base is coming soon!
Conclusion
This was a long project and overall I am very pleased with my result. I learned a lot and testing many different things. I think this definitely marks a turning point for myself in how I am thinking more deeply and purposefully in my painting.
Overall I think I have the promise of great growth for 2021 and can’t wait to see where I go.