How have I gone so long without doing a state of the crazy? Can you believe I haven’t written anything since February? This year has absolutely flown by and i’m utterly speechles.
Hello! I’m here, trying to get the cobwebs out and get back into the thick of it.
What has happened in 2022?
In short a lot has been happening here at the crazy household and I apologize for my absence. Every since February I have been on a long journey of re-entering the workforce full time in the video game industry. If any positive from the global chaos is that the game industry has drastically opened to be more remote friendly. This has resulted in so many more possibilities and opportunities for my background in game design. I have since been back into it for about 6 months and finally getting back into a routine. I’m really excited by this opportunity and it is an area of game development that is new and challenging.
I have also hung up my stay at home mom hat to put my tiny minions into daycare which has come with numerous colds, flu, and two rounds of covid… ugh. We are all fine and healthy but after spending two years in quarantine getting back out in the world has taken a toll. I have also lost a grandmother who was the one who opened the world of hobbying to me to be a lifelong pastime and something to be proud of. Picking back up the blog is something I know she would be proud of.
Beyond those major life events, construction on our home, expecting another player addition in our family early next year, and the general chaos life. Well it has drastically pulled me away from being able to write.
So now the real question…..
What have I been doing in my tabletop gaming in 2022?
Well that answer is not nearly that simple but yes I have never stopped hobbying and am still as in love with it as ever.
First of all I am currently no longer doing presupports for Tableflip Foundry due to having another job that keeps me busy. I love the gang over at Tableflip and will always support and endorse what they do. I loved participating and being a part of the community to help artists bring their models to the average every day consumer but now I have time to put some personal models onto my printers instead. I have resulted in gaining a ton of random models that I have extra and don’t really need. One day i’ll figure out what to do with all those prints I don’t really want….
Secondly I finished painting my snotling Bloodbowl team which I absolutely love. I have not dove into Bloodbowl as much as i’d like this year because I have been sidetracked.
The largest project and undertaking I’ve gone on this year is by starting and learning Age of Sigmar by Games Workshop. Starting with the Dominion box for 3rd edition. I have started playing the Kruelboyz from the Orruk Warclans. Painting has been on going slow much like all my projects this year but I love it.
Well maybe not the largest undertaking i’ve done this year. I’m still working on the largest 3d print I’ve ever attempted in my life. I am still not quite done but perhaps in a week I’ll share the final product!
Anyways I know this has been short and sweet but I am working on turning things around. Its great to see everyone. I hope you have been happy and hobbying,
Last week marks a special milestone for me, One Year of Owning a Resin Printer. I can’t believe that I have only printed on my Phrozen Sonic Mini 4K for only a year because looking back on it, WOW have I accomplished a lot. While I printed my first resin miniature back in 2018, i’ve waited some time to have my own.
Since I have had a resin printer in my home for a year I thought i’d take this opportunity to share some of the questions I answered before jumping into this aspect of the 3D printing hobby and share some of my experiences.
My shiny resin printer ready to be played with right out of the box.
Backstory
Over the last two years, resin printing has absolutely exploded. Printing in your home has become significantly more affordable as well as product variety in both the printers and material.
When I started looking in the 3D printing hobby, entry resin printers started around $500 with average cost of resin $60 for 1 kg of resin. Now people can get into the hobby for less than $200 a printer with resin costing about $30-$40 a kg for average users. On top of that material resin has grown in water washable resin, tough resins, flexible resins, transparent resins and more. These were available in the past but the number of companies offering options and variable price points around the world have grown tremendously along with improvements in formulas.
Not only has the cost of resin printing and availability of products grown over time but the market is absolutely stuffed full of artists and there hasn’t been a better time to find model variety for your tabletop games, display painting, wargaming etc.
My Personal Goals & Criteria for a Resin Printer
Before jumping into resin printing I set rules and answered several questions before buying.
Budget: Around $250 Printing Usage: Primarily miniature figures and bits Size: Did not matter for me as I already owned a large volume printer with my Prusa Mk3s FDM printer Goals: To create model figures and things I haven’t been able to do well on my FDM printer. Also learn a new method & technology of 3D printing
Narrowing Down the List
In summer of 2020 when I was researching what resin 3D printer to buy a few major milestones in resin printing development were happening for the 3D community.
Large Format printers were hitting the marketplace for the the everyday hobbyist. These include products like the Elegoo Saturn which is almost 3 times larger in volume than the Elegoo Mars 2. Why is this important?
Faster printing: Since the build plate is larger. Hobbyists can make more objects at a single time making it capable of producing more miniatures per print in the same amount of time.
Print Larger Objects: Due to the larger volume in both the print bed but also the Z-axis. People can now print buildings and larger monsters easier with fewer cuts and keys.
Monochrome Screens were being released as a new and improved screen for resin printing. Example model the Phrozen Sonic Mini 4K. Essentially each monochrome screen aimed to project more blue light at 405 mm wavelengths which is the light used in the photochemical reaction of resin printing. This is an improvement over the standard LCD screen with equivalent light sources of Red, Yellow, Blue. Why is this important?
Faster Printing. Since there is a higher light efficiency projecting from the screen. Print exposure times go significantly down meaning it takes less time to cure each layer of resin and therefore producing a miniature faster.
Longer ScreenLife Spans: since the screen is emitting light more efficiently, it is therefore on for shorter intervals and will last longer. This saves the consumer more money in the long run in having to replace the screen. Marketing of monochrome printers say the lifespan can be 4 times longer than its LCD counterpart but only time will tell if that is true.
Since the evolution of 3D printing would undoubtedly result in faster printing the question still remained. Did I prefer a larger printing volume or higher resolution printer with a longer life span?
You might be asking “what do you mean higher resolution printer?” Glad you asked resin printing is based on the resolution of the pixel density of the screen and not just the resolution of the screen. Therefore if a printer has the same 4K resolution but one has a larger print volume the XY resolution of that printer would less than a 4K resolution small printer. As you might have guessed from reading my blog already I decided upon the Phrozen Sonic Mini 4K which was a 35 micron XY resolution printer vs the Elegoo Saturn with a 50 micron XY resolution.
My Resin Printer in its new home
At that time the Phrozen sonic mini 4K had the best marketed XY resolution ever to hit the hobbyist market. Currently it is matched with the Elegoo Mars 3 at 35 microns and beaten by the Epax X1-4K at 32 microns. Due to it being one of the first of its kind I did go slightly over my budget (approximately $300 early bird special) and jumped on the 1st wave of orders. I was absolutely thrilled to begin this new chapter of my printing journey.
Safety Concerns
One of the largest reasons why I waited so long to get into resin printing was not having a safe space for harmful fumes while printing as well as having a working space for resin away from my small curious and ever growing child. The safety concerns and studies regarding resin printing are vast and too big for discussion today but let me know in the comments if you wish for me to go into it more.
Even though I did spend roughly a month printing out of an old wooden wardrobe. My partner and I built an enclosure to become the future home and current home of both printers, their materials, and tools needed while venting out of the house.
Once I got the printer, the setup, I set to work.
My 3D Printing Enclosure
Lessons Learned
Admitting my Stubbornness
Much like the excitement of starting 3D printing, resin printing completely opened a whole new world for me. While i’ll always be an advocate of FDM printing and consider there to still be a place for filament printed miniatures. I admit I absolutely prefer resin printed miniatures over FDM. I am without a doubt someone who will “Fight” others to say you can print tabletop standard in FDM but resin miniatures are leaps and bounds better in quality with less time committed than FDM.
Resin (left) vs FDM (right) of a jaill cell
Troubleshooting & Getting Started
When in doubt relevel your print bed. This is the cause of a significant vast majority of 3D printing issues for resin and unfortunately takes practice.
Also factory settings or even other peoples settings are not the best print settings for your printing environment and printer. Resin printing can be more temperamental than FDM so just sharing of print profiles does not work as easily. use these as recommendations to start from and run many calibrations.
Avoid Being a First Adopter
I now vow to avoid being a first adopter to a printer in the future. As one of the first people to own a Phrozen Sonic Mini 4K I absolutely love my printer BUT it isn’t perfect. What i’ve learned the hard way is that printers come out so quickly in-depth quality assurance is not always the case. Thankfully the model has improved over time for new owners purchasing the mini 4K. I’ve most nortiously struggled with my z-axis and issues associated with it such as banding and locking into place.
For the future i’ll wait a year or so before buying into a printer and let others pioneer the path. Being a mom of young kids I do not have the time anymore for such indepth troubleshooting.
First Prints
To start off printing I jumped right in and printed my absolute favorite monster the Owlbear. This baby owlbear is made by Manuel Boria and is one of the models in his welcome pack for joining his patreon. There are 3 in this set and immediately I was blown away by the detail of the sculpt with the tiny paws, fur texture and even cute eyes. Also looking back i’ve realized that i’ve also significantly improved my miniature photography skills.
Most Failures & Most Expensive Printing
I’ll never forget the hard hard lesson of knowing how much resin you should put into your printing vat. I must have failed about 4 times on the top leaves portion of the Heartwood Treant by Lost Adventures Co. Each failure was around $6 an attempt, ouch. This is by far now the most “expensive” model in my collection to print because of it.
Favorite Model
My absolutely favorite model printed to date was one I least expected the Graveyard Golem. Man does this figure have some incredible character. Much like I describe on the write up for printing this model I did not expect to fall in love with the model like I did. However the render of the figure did not do it justice for all the detail and storytelling found on the figure. I can’t wait to paint this!
Conclusions
Overall resin printing has not only really enhanced my 3D printing experience but in general has really motivated and inspired me to paint more. I truly do not think I was fully into the hobby as a “miniature painter” but after being able to print incredibly detailed sculpts and bring ideas to life it absolutely has changed me. I still consider myself new as a miniature painter and attempted to grow but have completely jumped into the hobby space.
Over the course of the last year i’ve learned a lot, grown a lot and have even recently joined the ranks of doing professional 3D printing support work. I am working diligently to bring much of my collective knowledge and reference material to life in a brand new “Printing Section” of the website. This section will contain, how to get started, troubleshooting, FAQ, tools and materials and more.
If you are on the fence of jumping into 3D printing i’d say it is absolutely worth it and there couldn’t be a better time to jump in the hobby. Have questions? Don’t hesitate to ask below as I’m always willing to help in your journey.
Are you working on anything special? Do you print miniatures or are thinking about it? Let me know in the comments.
As always Happy Crafting, Carrie aka crazmadsci the Crazy Mad Scientist.
The Blacksmith building from the Kingdom of Thamarya Kickstarter is the 2nd installment into my goal of a complete set of the entire building collection. It has been slow but steady. Every building I make I feel as if I am always trying something new and pushing my knowledge and skills as a crafter and hobbyist. The absolute dream is that at the end of the year i’ll have an absolutely mind blowing tabletop to share. Although I’m behind in painting the population for the kingdom and the scatter terrain. One battle at a time.
As for the current status of the Blacksmith building I have assembled and almost completely (a few exceptions) primed the building as a whole. I have spent a little bit of time putting on paint for the walls of the building but definitely not enough to claim a base coat. If you would like to read more about how I printed, assembled and my overall experience with the Blacksmith building make sure you check out its main project page, Blacksmith: CastnPlay.
Even thogh the building is printed and assembled, one thing that has taken a significant amount of time is the post process and creative modifications done to the building itself.
Post Processing
First of all what does post processing even mean in regards to 3d printing? Since many of my readers do not 3D print I will explain. Post processing refers to any task that is put on a printed part to touch up, clean up, or enhance the piece. In some cases that would mean support removal, or resin printing clean up. In the situation for this post I am referring to any manual crafting I’ve done in order to truly enhance the building itself.
The first step for cleaning up the assembly of the Blacksmith building was to fill the gaps of the roof. There were some difficulties in the assembly of the Roof due to printing an early beta version of the house (Read about it: Blacksmith Roof Assembly). As I had to cut and trim several of the pieces to ensure that they fit together. The gaps of the model showed more significantly than I would like. As a build I would like to own for years and years to come, I knew that the labor to clean it up was worth the time.
Since i’ve been experimenting with different putties, clays, and sculpting mediums for this type of task, i’ve opted to try Milliput this time around. Milliput is an epoxy putty which comes in two parts to sculpt and harden later on. In previous experimentation on a base I found that Milliput was much harder when cured than Green Stuff which I thought would be perfect for a building.
Overall I found Milliput easy to work with over large surfaces if I also introduce a bit of water to my tools and fingers. As you can obviously tell from the roof itself though, my sculpting skills are still a work in progress. The edges are not smooth and milliput filled in the gaps of the tiles at the bottom. I ended up using milliput on the top of the roof to fill the gaps as well as attempt to smooth the underside of the roof from imperfect filament sagging due to print orientation. I know that almost no one will ever see the underside of the roof but I’d know. I choose to attempt to fill in the roof underside rather than sanding or trimming because it was a large flat surface that would have taken way too much time to do along with the fact that the Milliput could strengthen the multiple pieces of the roof. I wasn’t too crazy worried about finish though because I could cut away harden Milliput I didn’t want or sand it down which is nice.
Please let me know if you have a better idea on sculpting material for this post process step. I am intending to try all sorts of mediums but always open to new ideas.
Front Porch Pillars
The front porch pillars were definitely one of my least favorite parts of the building. I do not know if it was due to my assembly of the house or its design but the pillars themselves were too short. In order to touch the roof they had to float off the ground and if glued to the base they would never support the roof. The second issue with the supports is that they never actually touched any other piece of the building in order to securely glue them into place.
When coming up with a solution I also factored in a few design constraints; 1) The interior has to be playable and roof easily removable. aka roof needs to sit flat on the tabletop. 2) The components of the building itself have to be durable both for storage as well as small children playing with them.
In order to fit design constraint number 1, I knew the pillars could not be glued to the roof as it would make roof removal clunky and not sit flat on the tabletop if removed. For the second constraint I decided to physically extend the stairs of the front porch to hold the pillars in place. To accomplish this I used small dowel rods to create a bit of structural strength and hold the pillars in the gap between the bottom step of the front stairs and the porch. Then using my newly acquired skills with Milliput and some freshly purchased metal sculpting tools I sculpted an expanded front staircase.
Overall I am extremely happy with the result and those pillars are very securely in place. I also learned that sculpting tools are an absolute necessary and I can’t believe I waited so long to purchase a set.
Functional Forge
One of the other major things I’ve been determined to do is include more is LED’s in my builds. I love the concept of having hidden lights in my builds or using them to really bring the table to life. This was the one build I chose to backtrack just for the occasion.
Since the interior of the building has a specific location for a forge and a 3d printable file for coals in that forge. I choose to drill out a hole for a standard tealight. Starting with one of the largest drill bits I could find, I drilled a pilot hole and then cut away material as I needed. Make sure you wear goggles if you ever try this! Cutting away the material was definitely difficult as I had to cut away at a seam between two pieces which had more solid walls but having a low infill of 5% material helped me as well. Since the edges were sharp I used Milliput again to soften the edges so people do not cut themselves pulling out the LED to turn it off. Note to future me: Cut out the tealight location digitally so it prints with the hole already cut away.
After I prepped the space and fit of the tea light I reprinted the coal file to be in transparent filament. This ironically is my first ever attempt at printing with Transparent filament even though the roll has been taunting me for over two years in my cabinet. Although I do not have a whole lot of experience with printing in transparent filament I am really pleased with the result. For the light itself I did a simple hole for the LED itself to sit in the printed coal file.
Now the next challenge is going to figure out how to paint the coals without turning this opaque. I’ll be sure to fill you in on what happens when I paint it.
Teaching Moment: For those not familiar with transparent filament for FDM printing. The process of fused deposition modeling (FDM) printing essentially melts down plastic through an extruder head which in turn recrystallizes into the the shape the 3d printing moves the nozzle. Due to this behavior it is extremely difficult to get a true transparent look in your 3d prints and the results are instead semi-transparent. To compensate for that people would ideally attempt to reduce the amount of layers or material that is printed to reduce the amount of recrystallization. Analogy: Think of it as making a window of thousands of tiny window panes vs a window with only tens of window panes. It is easier to see out of the window with less window panes.
Magnetic Blacksmith Sign
Last but not least for this building I decided to magnetize the sign for the Blacksmith. This could make it so the building would appear like any building as well as improve storage capabilities. I am nervous about storing the building with the sign jutting out of it because I admit to not being hard on my models. I used 4×2 mm magnets and placed one in the hole of the building wall where the sign would go and one on the end of the sign. Overall these fit well but I do wish I drilled a hole into the wall so that way the sign was more sturdy.
This is definitely not fancy by any stretch of the imagination but if you want to do this the 4×2 mm magnet is a perfect fit!
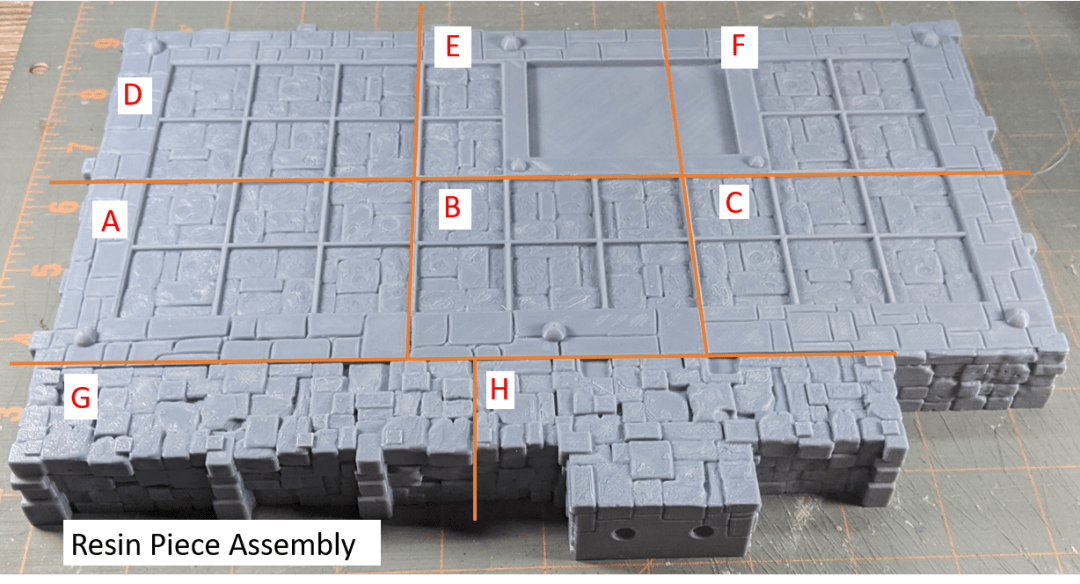
Documentation Improvements
One also major thing I’ve done with the blacksmith project page this time around is to attempt to provide an assembly diagram for either print method of your choice. Since FDM printers have a larger print bed and are easily more capable of printing with large flat surfaces, the team at CastnPlay has reduced the total pieces to print for FDM models. As a result assembly, total number of pieces, and even part names could be different between FDM and Resin models.
I am still ironing out a way to improve the look of the graphic to articulate the difference but would love to hear what my readers think about the attempt to cater to the community since there is no guide to assembly of these buildings at this time.
Also since others may be like me. I am also including a overlap or translation table so that way if you print in both FDM and Resin for the pieces of the buildings you know what pieces in the resin files would match what pieces in the FDM files. Is this easy to understand and read?
Other Buildings in Progress
The Blacksmith is not the only building i’ve been working extensively on over the last few months. I have successfully printed to completion not one but two Cottages from the Kingdom of Thamarya collection. I decided to create two variants for these buildings a two story and a three story. I am currently in progress of writing, updating and releasing the product page as well as a status update for the buildings like I’ve done for the Blacksmith.
General Store: This building is currently being actively printed. I started a while ago, got distracted, and am finally on pace to potentially finish printing this building this week.
Definitely let me know in the comments below if you liked an idea or think I could have tried something different. I’m always looking for more ways to experiment.
I get a specific question a lot lately and feel like I am long overdue a discussion about it. The question: “Are you playing any (video) games right now?” The brief answer as you could have guessed by reading the title is, No.
This might come as a shock because for years a vast portion of my identity has revolved around video games. I love to be immersed in a world, fall in love with it’s story while meeting and getting to know people from all around the world. I love to see the art, skill and design others put into games and understand how they work. I have even worked professionally as a broadcaster on twitch as well as in the games industry. However that has changed in the last year.
My main character Crazmadsci from the Elder Scrolls Online
Due to the events of the world of 2020 of which I don’t need to list. Every single person has felt an extra level of stress, confusion and uncertainty for the future. No matter how hard anyone tries that stress inevitably leaks into the things they do to have fun and relax… video games. Over the course of 2020 the activity I spent to decompress from my day started to become the most stressful part of my day.
It became obvious that people used their anonymity to take out frustrations on others, vent, or complain how the developers don’t care enough to fix it. As I experienced raid groups disbanding, guilds crumbling and increased arguments. It became obvious that my oasis of peace became an added source of anxiety. Something had to change.
As a result crazmadsci.com was born. I have always loved tabletop games and especially the creation portion of the hobby. Almost as long as I have played video games I’ve loved models. So instead of playing online in a world that constantly reminded me of stress and anxiety I’ve learned to unplug from it all and spend time in self reflection and 3d print and paint models, figures and terrain for tabletop games. Instead of being frustrated about things I cannot change I create and build for a future where I can sit around the table again and immerse myself in a world with others. I focus on what I can change… My skill in the hobby.
Also a portion of me, almost as strong as my passion for all things games has also been to teach. I love to share what I know, inspire others from my enthusiasm, and document my personal growth and discovery. This site is to attempt to capture all the things I love: games, creation, and teaching.
Am I saying that I’ll never return to games? Oh absolutely not. I am strictly taking more time removed from the mouse and keyboard and instead picked up a paint brush more frequently. For all of my friends who have asked and are concerned for my absence, I’m sorry and miss you too. Thank you for noticing and asking that question. Don’t worry games are in my blood. I’ll be back. In the meantime follow along in my journey here.
I have been struggling to figure out how to type this update for sometime. In short I am living up to my name and life has been CRAZY. The last two months have been absolutely nuts.
Real life wise I ended up going to a very very small last minute backyard wedding, got a new job at a video game studio which is working towards launching world wide, very soon more news to come. Along with that I’ve seen a few members of my family and took a very small vacation.
Hobby wise my printer has given me more problems that I’ve ever had in the last several years of printing. My printer has had issues with stripping of the screw for locking the gear drivers that pull my filament. I attempted to replace which completely caused extrusion errors across the board. I have had some small nozzle issues, and on top of it all my power supply on my Prusa mk3s died completely and needed replacing. It has taking a while to get back into production due to the little amount of time here and there to tinker. But I think i’m now completely back in business! I have learned a lot more about 3d printing as a whole having rebuilt my printer at least twice over the last 2 months but i’m better for it. At least that is what i’m telling myself.
Project Status:
Overall like always i’m never short in projects i’m working on.
Fat Dragon Games miniature project: Since starting this site I started on 100% printing the Fat Dragon Games miniature kickstarter from 2019. I have now completely finished the project! All 94 unique miniatures and a few extras accidentally printed. There are a few ups and downs and I am still due to finish write ups for each set and a global breakdown. I am determined to get things to publish.
New Kickstarters Since I finished the last major project I’ve started working towards completing not one but TWO 3d printable kickstarters.
The Fantasy Props kickstarter was voted upon by several of my friends as the next project I work to tackle. It has a ton of dungeon dressing and scatter terrain pieces. Overall I have a mixture of love and frustration with the pieces and am starting to think that some of these pieces would be perfect for experimenting with flexible or more durable resins for SLA 3d printing. At the moment I am going to hold off printing the rest of this kickstarter until my SLA printer shows up.
Monstrous Encounters. I cannot miss mentioning monstrous encounters by DungeonWorks. As some people know me personally DungeonWorks is by far my favorite company and dungeon tile system to use. As a 3d printing company DungeonsWorks has been around longer than many. They released this kickstarter in 2019 right after the Fat Dragon Games one as another set of miniatures that do not require FDM printing with supports. I figured to keep with the FDG theme and knock out these undead bad boys as they are designed for FDM printing in mind. I am absolutely falling in love with the monstrous encounters print and sculpt style.
Overall I’ve having a ton of fun printing the two projects and will continue to chug along. I have honestly been enjoying the monstrous encounters immensely as they are some of my most favorite 3d prints to ever assemble. The fantasy props I’ve encountered a few model issues and 3d printing issues as these are significantly smaller pieces than standard terrain and require significantly more finesse.
New 3d Printer!
I recently pulled the trigger and purchased my first 3d printer. I have ordered the Phrozen Sonic 4k Mini. I’m so beyond excited for this new avenue of adventure i’m on and should be receiving it at the end of the month/early October.
3d Printing Enclosure.
Since i’m soon going to have a resin 3d printer I figured it was about time that I started to build a more permanent enclosure for my 3d printers that also include proper ventilation to push air outside the house. The process has begun and is going to be a mega build. SO far the base is assembled and shelves to hold filament are completed. The enclosure top needs a finished design, ordered, and assembled.
Here is a picture of the bottom cabinet in progress.
Craz’s Musings
Last but not least the website. I am really determined to try to make something special as a way to collect information and grow with a catalog of history and experiences regarding 3d printing. I do not necessarily know if this is just going to be the ramblings of another random person on the internet or I find a niche in the tabletop community to really help it grow. I have yet to pull the trigger on purchasing a plan for wordpress and have told myself that I will not do so until i’m no longer “embarassed” with the lack of content on the page. This could just be imposter syndrome. But I think full write ups are important especially for getting started and commonly asked questions.
I am determined to catch up in my posts to be more reflective of my current projects and will definitely spam will content shortly. As for the deep informational pages, well those will have to adapt slowly over time as they require significantly more work and thought. I really want to do this well.
I think that is everything but if not i’ll fill you in more in the future. Thank you for reading. Don’t hesitate to reach out with questions, comments or concerns.
Starting this blog and project of documentation I have become so excited and passionate to start SO many projects. It is honestly super thrilling to have so many ideas bouncing around my head. Even the little bit i’ve shared of this blog has seen so much more support than I ever imagined. I hope this to one day be a place which will spring board creativity, research and knowledge to all the incredible resources that are out there for tabletop gaming.
However, This week alone I feel like a person at Thanksgiving Dinner seeing all the food, filling my plate and once I sit down go… “OH SHIT, I can’t eat it all”. Trying to pause and think, “What should I accomplish and really tackle first?”
I have ideas of becoming more than just a blog where posts get lost as more and more gets written. I strategize of standard pages such as “Terrain, Miniatures, Calibration, Troublshooting etc” which will be a go to location for each thing linking to blog posts which go deeper into the topic. I hope to eventually have a page for individual monster types with a Lore spotlight, printing and painting history of every different version of that monster I have ever done. For example there are so many creators and incredible sculptors who have done different variations of the Goblin. Wouldn’t be be great to see what is out there, what is free, where to get it?
I want to start dialogues about the rising tensions of FDM vs SLA for miniature figures. The frustrations of an analytical mind and the rising “Scale creep” of miniatures for easier printing.
I want to build and flesh out battlemaps of published campaigns for DMs to have an exact print list of what is required making it easy for planning and assembly. I want to have conversations about “Should you build a whole battle map?” “When is it important?” “Whole walls vs Half Walls?” etc etc etc.
My mind is racing with the possibilities.
I hope that people will critique me as I try to improve my painting techniques and be a testament to the journey of improvement.
I need to be patient, keep plugging along and flesh this out. I hope to help others grow too. More importantly I hope to make friends.
For the community that is out there. Do not hesitate to make a request or comment!
Starting a new hobby or project is always exciting and scary simultaneously. There is always the thrill of the unknown, excitement of what is around the corner. Starting a hobby all over again after you took a break from it has all the excitement of a fresh start matched with the “OMG what have i done?”
I began 3d printing for tabletop gaming in the summer of 2018 using public community printers at a university I worked out. Since that time i fell in love with and bought a Prusa i3 mk3s running it almost nonstop until Spring of 2019 of which I abruptly stopped. All of my stuff was neatly packed away waiting for that desire to craft to come back.
That deep drive to create incredible and mind blowing things for tabletop gaming is back with a vengeance. However much of my depth of knowledge, progress of projects, and collection of documentation is lost to the wind. I have to not only start again but also figure out where I left off. I hope that it is like riding a bike.
With that I have decided to start brand new! I have decided to write a collection of my experiences, things that I’ve learned, common mistakes, battle maps and so much more. Perhaps sharing to the ether will foster a community to provide inspiration and feedback. Perhaps I shall just talk to the ether alone. Who knows but it should be fun.
Why am I doing this?
Since it is 2020, the year as not been so great for many people including myself. I have dreamed of doing something like this for a long time now but never got the courage to do so. Everyone needs to find gratitude in their daily life and feel accomplished. I believe breaking my crafting into consumable chunks will bring me a sense of accomplishment and joy to overcome any negativity happening in the world today.
How am I doing this?
So much of the information I am looking for, knowledge, resources, files etc is scattered all over the place and I like putting it all together in once place. I am going to attempt to break things into sections such as Terrain, Miniatures, 3d printing, Troubleshooting etc. Each post will be tagged and sorted as such. Further features will be flushed out as the need arises.
Be apart of the story!
Comment, challenge me, reach out. I want to share ideas, grow in knowledge and skill. Lets build community together!