Last weekend a disaster struck. A massive majority of my miniature collection has come crashing to the ground thanks to the adventuresome behavior of my cat, Turtle. You see at the moment my miniatures are being housed in an old bedroom TV cabinet as I am working on “figuring out” an improved method of widespread storage. In reality I have been continuously making it worse by stacking an increasing number of boxes and containers on top of each other just waiting for the day something shakes the whole tower down.
Well that day happened. On Saturday I heard a large CRASH and was terrified it was my curious toddler. I go running and immediately feel two emotions. First I am absolutely relieved to find that no child or animal was hurt. Secondly I felt my heart sink to my stomach as I saw the devastation the laid before me.
Miniatures lay in pieces scattered over the floor as hundreds of models crashed on top of each other, into other boxes or just spread out. The largest damage of which is my painted miniatures of 2021. Over half of all models painted in the last year lay in pieces.
Some batch of models in pieces.The culprit! Turtle the Cat
Trying to Piece it Back Together
I then proceeded to spend a large portion of my time to see if I can glue as much of the minis together. While I was trying to piece much of my hardwork of 2021 I had an inner dialogue of problems and perhaps ways I can fix them and should focus on for 2022.
The surgical field, to glue models back together.Haggatha the NecromancerLizardman, Lost Adventures Vol 1Hill Giant, Lost Adventures Vol 1
Trying to Solve the Problems
Actually Utilizing My Storage Solutions
“Carrie, why in the world did you wait this long to try to organize your models?”
Voice in my head
You see this is actually ironic because last year I spent a long post series on organizing my collection & hobby space: Storage Wars. I even went as far to develop a new storage tray system for my models (Storage Wars: Part 3 Miniature Storage Trays). Yet in my haste towards the end of the year I did not fully utilize system. The biggest issues that I have is that I have no way to display or store models I’m using that are completed.
Solution: Actually utilize my storage solutions! Take the time to put models away. Find a way to store finished models safely or on display.
Experiment with New Materials
The harsh reality of it is that resin from 3D printing can be extremely brittle. Depending on the material used, duration of cure times, or even staying in storage exposed to UV light can increase this brittleness in your resin models & terrain. Towards the second half of last year I began to use harder resins which are more impact resistant making them more likely to just break rather than shatter. This was definitely noticeable in my Dwarven Frostgrave army printed mostly in 2020 rather than my husband’s necromancer undead army printed later 2021. When the newer models broke I could find most of them to try and glue back together. However some of the original resins used that were basic resins without additives such as ABS-Like or Hard were more likely to shatter rather than break. Let this be a testament on more durable resins being valuable! However in truth and with all the benefits of 3D printing the brittleness of the models definitely is a very strong negative about the 3D printing hobby. I had no reaper bone model damage, metal model damage and very little hard plastic model damage.
Solution: Prime all printed models to prevent more curing from storage & investigate and start a series of experiments with flexible resin additives to give models more give and capabilities to stay intact.
Begin Cataloging My Collection Again
Last year I started a database of my miniature collection as well as a visual catalog. While it is still a long way to go it is a start. One major downside to this is that in December I sold off a large portion of my collection and did not update my spreadsheet or visual. I need to go back through the list and update the data before I can continue to grow again.
Solution: Update the Spreadsheet, visual catalog and actually track the known vs unknown.
Conclusion
I recognize that finding better systems to account for ever curious toddlers and adventuresome creatures is a much needed thing. I wish I could have shelves to hold the things I love and have spent time on but just do not have the space for it in our home. If you have a precarious pile of models this is my warning to you to make it safer.
How do you keep your hard purchased or crafted items for your tabletop games safe? I keep telling myself that this is the moment where I learn my lesson, but only time will tell.
I am definitely riding the high from this year’s 2025 Nova open. And what a treat it has been to go to and see my friends. I always walk away full of inspiration, a bag full of goodies and a mind full of creative endeavors to do for next year. Heading to the event I…
Playing Bloodbowl is wacky and fun. But wouldn’t it be better with a fully fleshed out stadium to play in? Join my process of creating a 3D printed bloodbowl pitch.
When working on improving any skill or hobby, oftentimes it is hard to gauge personal growth. You can become so deeply focused in your task that having the capability to step back and gain a larger perspective is difficult. Or in some cases the improvement may be so small or subjective it is hard to determine any improvement at all. This can lead to frustration, lack of motivation or even burn out.
How can you to solve this problem?
Last January I set out to try to solve this issue. I painted a benchmark miniature figure so that I may judge my improvement over the course of one calendar year. This benchmark was at that time the very best I could do in painting a miniature. I set no time limit and poured myself into it. The primary goal was to test if I could see a before and after of how far I developed as a miniature painter.
So what is a benchmark?
Something that can be used as a way to judge the quality or level of other, similar things.
So in this situation I used the same model painted a year apart to test their different quality levels.
Setting the Baseline
Here is an image of the model painted January 2021. If you want to read more about my thoughts about it at the time and painting read the 2021 Benchmark Model.
2021 Benchmark Model: Dwarf
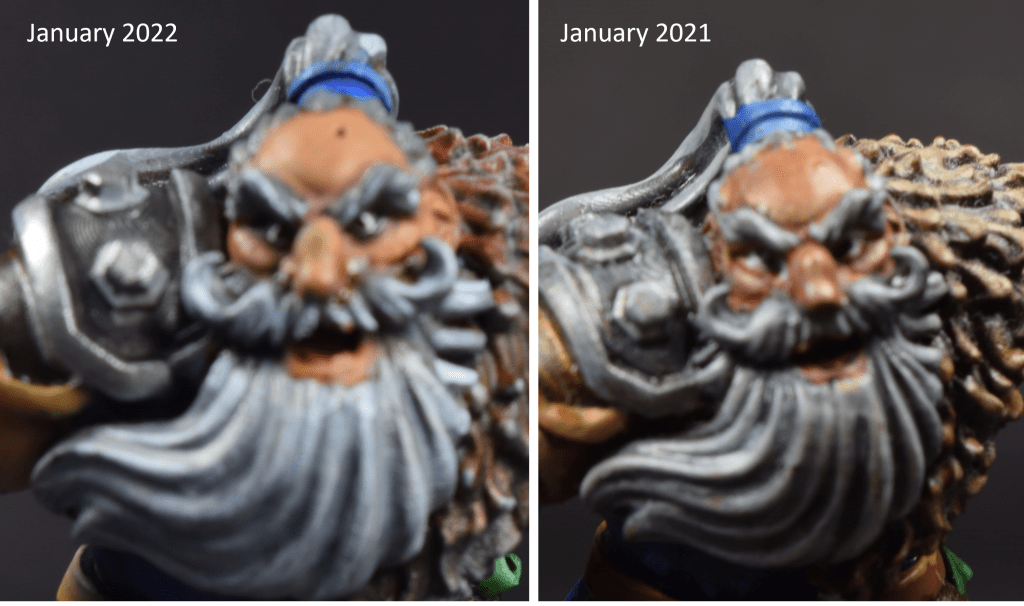
So the million dollar question, have I improved a year later?
Have Others Give Their Opinions
Left 2021 Benchmark, Right 2022 BenchmarkLeft 2021 Benchmark, Right 2022 Benchmark
When I finished painting this model last week I will admit to feeling a bit deflated. I attempted to focus on painting the new model using a similar paint scheme in hopes that the comparison should not be influenced over preferred color. However when I placed the paint brush down at the end I was not Wowed. I felt no immediate pride or even noticed any significance in difference of my model. In my mind I could only envision where I wanted to go with the model and yet didn’t have the skill (seeing only the flaws not the victories). I couldn’t step back and admire what I could accomplish in the today.
So I decided to ask for help to take a photo to my friends, family, and fellow members of the painting community. The question was simple. “Which model is the newer one and why?” Could people see my improvement where I could not? Could people actually see the areas in the hobby I desired to improve upon in that year?
The conclusion was simple. Every single person who guessed my old model vs my new model was correct. No matter their background or skill set there was not a single person who guessed was wrong. Even non-painters saw growth.
Here are some of the various pieces of feedback and comments I received from different platforms:
Basing is fancier, the skin is smoother. In general fewer visible brush strokes.
The metal looks more like metal, than “gray”. The skin looks more natural, and less glossy. The basework is more complex. The eyes look more natural too. Overall, just appears to be a higher quality paint job.
Both are better than my painting. They look great, but skin on the right looks way better.
Looks like smoother coats. The eyes are better. Cleaner paint work on the rims of the pauldrons. Just all around more attention to detail on it. Some blending on the cheek bones it looks like
The Consensus
Significant areas of improvement were the base of the model which was vocalized as was fancier, more adventurous, and more complex.
It was also noticeable on my improvement with skin & eyes. The skin did not have a glossy appearance (Nuln Oil has a gloss version by the way). Also the layering of my skin was better. My work at setting a baseline with skin using the Hill Giant last year really paid off here.
Lastly my metallics appeared to be better. Did not appear as a basic gray but had sharper lines and better brush control with edge highlighting.
However there was also a repeated opinion that it appears that I am also making a stylistic change. Moving away from washes in the beard and cloth perhaps took away from the contrast and did not push the highlights as much as I did a year ago. Check out the comments.
I feel like the right one has sharper lines and colors so my instinct is to go with that one being the more recent one, but it almost feels a bit like a stylistic choice between the rougher more blended palette and the sharper more distinct style
This comment also gave some feedback on potential improvements with washes which I absolutely agree with.
Looks to me like the one on the right is the more recent one. The one on the left you used more washes, the one on the right more highlighting. There are things about both that I like. With the washing, I’d say try and go a little less wet, you have a lot of the ‘coffee stains’ where your wash dried to the edges and makes your ‘creases’ a bit of a mess. Less paint on the brush. BTW, a wash that is dabbed on a paper towel till mostly dry is essentially a glaze technique which looks like you did on the right guys face, looks great! One thing I like about the wash is you maintained a lot of contrast. To tighten up your highlights, thin the paint, dab from brush, and do multiple passes if you have to. Overall, I like the composition and I think with just a few tweaks you’ll have some new things to explore.
My husband even agrees that the beard in particular he prefers on the old model than the new one. This is something that I need to go back and work on for sure.
More Detailed Comparision
One thing I absolutely forgot I did when I wrote the 2021 Benchmark write up is I included specific areas of desired growth. Listed below. Lets go through and see which ones I succeeded in.
Aspects of Desired Growth
Fur: Can I learn to paint fur better that it could even dictate the type of animal it comes from? Potential area to improve skills and knowledge in drybrushing?
Left 2022 fur, Right 2021 Fur
No Change. This aspect I consider no growth. They were essentially the same with contrast paint used on the newer model and more drybrushing and colors used on the older model. None scream as a better approach but rather just different approaches.
Armor: Methods and ways of painting True Metallics in miniature figures. Can I make armor shine? What are the different types of metals?
Left 2022 metal painting, Right 2021 Metal Painting
Success! This area was commented numerous times as significant areas of improvement. Use off better metallics along with selective use of washes and significant improvements on brush control & edge highlighting shine here.
Weapons: How do I make metallics & weapons look more battle worn and dinged?
Top 2021 sword, Bottom 2022 sword
Fail? (Just Different) I personally think that the weapons look less battle damaged in the new model vs the old. The use of the wash on the sword really helped give more of an aged aesthetic.
Skin: Starting completely from scratch. Largest desire is to have growth and variety in skin tone for my miniature collection.
Hair: Much like skin I have not put much effort into growing or researching this area in miniature painting.
Left painted face 2022, Right painted face 2021
Success and Fail. In this aspect my skin and eye are significantly improved but the contrast off the beard was preferred on the old model. I am proud of where I started with skin but want to research hair more.
Cloak: Layering and contrast. Can I improve my layering? Make smoother transitions in blending the layers? What methods & techniques work best for me?
Left painted cloak 2022, Right painted cloak 2021
Success. Improved blending was definitely an area off focus here. I worked quite a bit last year on glazing and next year hope to grow in wet blending. Also work towards improving those highlights.
Technical aspects I seek to improve upon
Improving Brush Control. Success
Zenethial Highlighting & Source Lighting, Success
Basing. Can I make the miniature tell a story, Success
Model appearance after basing2021 Benchmark Model Take 2 Primed via AirbrushAirbrushed Primed 2021 Benchmark Model
Adjacent Goals
Improve my miniature photography, Success
3D Printing the Figure
Can I improve the state of the print itself? Success
Methods to improve post process clean up, Success
Note I did break a hand/weapon joint and had to use green stuff to clean it up again. Success no breaks
Of all the other areas I wish to grow I definitely feel like I hit improvements on each single one. This is a really good feeling.
Final Photographs
Left 2022 Benchmark, Right 2021 BenchmarkLeft 2022 Benchmark, Right 2021 BenchmarkLeft 2022 Benchmark, Right 2021 BenchmarkLeft 2022 Benchmark, Right 2021 Benchmark
Paints Used
Not only did I improve in some painting skills, I also am happy that I have started a paint journal to keep track of paints used, notes, and thoughts during a project. Sometimes those notes are simple such as here.
Benchmark Model Paint JournalPaint Journal for Benchmark Model Page 2
Conclusion
I am super glad that I took the time to paint this model and do a benchmark test. Although I was disappointed the moment of completing the figure looking back only a few days I am excited about my growth in the hobby. This write up has also been immensely helpful to show me that I am indeed getting better.
One thing I definitely take for granted and need to articulate is the fact that along with improving my painting skill, I have sped up tremendously. While the original model was painted over 5 painting sessions this one was over 2. This is also an area of hobby growth.
I highly recommend a benchmark model if you ever feel like you are stagnant in your hobby or skill growth. This was a fun experiment and I am definitely going to be doing another one for this year and perhaps make it an annual thing. If you want a sneak peak as to what I’m working on make sure you follow me on Instagram.
Have you ever painted a benchmark? Can you see a difference? What should I focus on for the next year?
Thank you for sharing this journey with me. As always happy hobby.
I am definitely riding the high from this year’s 2025 Nova open. And what a treat it has been to go to and see my friends. I always walk away full of inspiration, a bag full of goodies and a mind full of creative endeavors to do for next year. Heading to the event I…
Playing Bloodbowl is wacky and fun. But wouldn’t it be better with a fully fleshed out stadium to play in? Join my process of creating a 3D printed bloodbowl pitch.
Last week marks a special milestone for me, One Year of Owning a Resin Printer. I can’t believe that I have only printed on my Phrozen Sonic Mini 4K for only a year because looking back on it, WOW have I accomplished a lot. While I printed my first resin miniature back in 2018, i’ve waited some time to have my own.
Since I have had a resin printer in my home for a year I thought i’d take this opportunity to share some of the questions I answered before jumping into this aspect of the 3D printing hobby and share some of my experiences.
My shiny resin printer ready to be played with right out of the box.
Backstory
Over the last two years, resin printing has absolutely exploded. Printing in your home has become significantly more affordable as well as product variety in both the printers and material.
When I started looking in the 3D printing hobby, entry resin printers started around $500 with average cost of resin $60 for 1 kg of resin. Now people can get into the hobby for less than $200 a printer with resin costing about $30-$40 a kg for average users. On top of that material resin has grown in water washable resin, tough resins, flexible resins, transparent resins and more. These were available in the past but the number of companies offering options and variable price points around the world have grown tremendously along with improvements in formulas.
Not only has the cost of resin printing and availability of products grown over time but the market is absolutely stuffed full of artists and there hasn’t been a better time to find model variety for your tabletop games, display painting, wargaming etc.
My Personal Goals & Criteria for a Resin Printer
Before jumping into resin printing I set rules and answered several questions before buying.
Budget: Around $250 Printing Usage: Primarily miniature figures and bits Size: Did not matter for me as I already owned a large volume printer with my Prusa Mk3s FDM printer Goals: To create model figures and things I haven’t been able to do well on my FDM printer. Also learn a new method & technology of 3D printing
Narrowing Down the List
In summer of 2020 when I was researching what resin 3D printer to buy a few major milestones in resin printing development were happening for the 3D community.
Large Format printers were hitting the marketplace for the the everyday hobbyist. These include products like the Elegoo Saturn which is almost 3 times larger in volume than the Elegoo Mars 2. Why is this important?
Faster printing: Since the build plate is larger. Hobbyists can make more objects at a single time making it capable of producing more miniatures per print in the same amount of time.
Print Larger Objects: Due to the larger volume in both the print bed but also the Z-axis. People can now print buildings and larger monsters easier with fewer cuts and keys.
Monochrome Screens were being released as a new and improved screen for resin printing. Example model the Phrozen Sonic Mini 4K. Essentially each monochrome screen aimed to project more blue light at 405 mm wavelengths which is the light used in the photochemical reaction of resin printing. This is an improvement over the standard LCD screen with equivalent light sources of Red, Yellow, Blue. Why is this important?
Faster Printing. Since there is a higher light efficiency projecting from the screen. Print exposure times go significantly down meaning it takes less time to cure each layer of resin and therefore producing a miniature faster.
Longer ScreenLife Spans: since the screen is emitting light more efficiently, it is therefore on for shorter intervals and will last longer. This saves the consumer more money in the long run in having to replace the screen. Marketing of monochrome printers say the lifespan can be 4 times longer than its LCD counterpart but only time will tell if that is true.
Since the evolution of 3D printing would undoubtedly result in faster printing the question still remained. Did I prefer a larger printing volume or higher resolution printer with a longer life span?
You might be asking “what do you mean higher resolution printer?” Glad you asked resin printing is based on the resolution of the pixel density of the screen and not just the resolution of the screen. Therefore if a printer has the same 4K resolution but one has a larger print volume the XY resolution of that printer would less than a 4K resolution small printer. As you might have guessed from reading my blog already I decided upon the Phrozen Sonic Mini 4K which was a 35 micron XY resolution printer vs the Elegoo Saturn with a 50 micron XY resolution.
My Resin Printer in its new home
At that time the Phrozen sonic mini 4K had the best marketed XY resolution ever to hit the hobbyist market. Currently it is matched with the Elegoo Mars 3 at 35 microns and beaten by the Epax X1-4K at 32 microns. Due to it being one of the first of its kind I did go slightly over my budget (approximately $300 early bird special) and jumped on the 1st wave of orders. I was absolutely thrilled to begin this new chapter of my printing journey.
Safety Concerns
One of the largest reasons why I waited so long to get into resin printing was not having a safe space for harmful fumes while printing as well as having a working space for resin away from my small curious and ever growing child. The safety concerns and studies regarding resin printing are vast and too big for discussion today but let me know in the comments if you wish for me to go into it more.
Even though I did spend roughly a month printing out of an old wooden wardrobe. My partner and I built an enclosure to become the future home and current home of both printers, their materials, and tools needed while venting out of the house.
Once I got the printer, the setup, I set to work.
My 3D Printing Enclosure
Lessons Learned
Admitting my Stubbornness
Much like the excitement of starting 3D printing, resin printing completely opened a whole new world for me. While i’ll always be an advocate of FDM printing and consider there to still be a place for filament printed miniatures. I admit I absolutely prefer resin printed miniatures over FDM. I am without a doubt someone who will “Fight” others to say you can print tabletop standard in FDM but resin miniatures are leaps and bounds better in quality with less time committed than FDM.
Resin (left) vs FDM (right) of a jaill cell
Troubleshooting & Getting Started
When in doubt relevel your print bed. This is the cause of a significant vast majority of 3D printing issues for resin and unfortunately takes practice.
Also factory settings or even other peoples settings are not the best print settings for your printing environment and printer. Resin printing can be more temperamental than FDM so just sharing of print profiles does not work as easily. use these as recommendations to start from and run many calibrations.
Avoid Being a First Adopter
I now vow to avoid being a first adopter to a printer in the future. As one of the first people to own a Phrozen Sonic Mini 4K I absolutely love my printer BUT it isn’t perfect. What i’ve learned the hard way is that printers come out so quickly in-depth quality assurance is not always the case. Thankfully the model has improved over time for new owners purchasing the mini 4K. I’ve most nortiously struggled with my z-axis and issues associated with it such as banding and locking into place.
For the future i’ll wait a year or so before buying into a printer and let others pioneer the path. Being a mom of young kids I do not have the time anymore for such indepth troubleshooting.
First Prints
To start off printing I jumped right in and printed my absolute favorite monster the Owlbear. This baby owlbear is made by Manuel Boria and is one of the models in his welcome pack for joining his patreon. There are 3 in this set and immediately I was blown away by the detail of the sculpt with the tiny paws, fur texture and even cute eyes. Also looking back i’ve realized that i’ve also significantly improved my miniature photography skills.
Most Failures & Most Expensive Printing
I’ll never forget the hard hard lesson of knowing how much resin you should put into your printing vat. I must have failed about 4 times on the top leaves portion of the Heartwood Treant by Lost Adventures Co. Each failure was around $6 an attempt, ouch. This is by far now the most “expensive” model in my collection to print because of it.
Favorite Model
My absolutely favorite model printed to date was one I least expected the Graveyard Golem. Man does this figure have some incredible character. Much like I describe on the write up for printing this model I did not expect to fall in love with the model like I did. However the render of the figure did not do it justice for all the detail and storytelling found on the figure. I can’t wait to paint this!
Conclusions
Overall resin printing has not only really enhanced my 3D printing experience but in general has really motivated and inspired me to paint more. I truly do not think I was fully into the hobby as a “miniature painter” but after being able to print incredibly detailed sculpts and bring ideas to life it absolutely has changed me. I still consider myself new as a miniature painter and attempted to grow but have completely jumped into the hobby space.
Over the course of the last year i’ve learned a lot, grown a lot and have even recently joined the ranks of doing professional 3D printing support work. I am working diligently to bring much of my collective knowledge and reference material to life in a brand new “Printing Section” of the website. This section will contain, how to get started, troubleshooting, FAQ, tools and materials and more.
If you are on the fence of jumping into 3D printing i’d say it is absolutely worth it and there couldn’t be a better time to jump in the hobby. Have questions? Don’t hesitate to ask below as I’m always willing to help in your journey.
Are you working on anything special? Do you print miniatures or are thinking about it? Let me know in the comments.
As always Happy Crafting, Carrie aka crazmadsci the Crazy Mad Scientist.
Last week I posted I paint job of the Hill Giant Tyrant Ogi Skullcrusher and my experimentation for painting skin. While it was setting my baseline for skill and observing room for improvement when painting skin I also really wanted to finish the model.
Since I already spent quite a few painting sessions on the miniature and already am behind schedule in painting my Frostgrave game with over 15 miniatures over the next month I decided to try in more detail the usage of citadels contrast paints. I am still very much new to using contrast paints and acknowledge a lot to learn. However here are some of my first experiences and observations using the paint.
What Are Contrast Paints?
Contrast paints are a paint formulated by Games Workshop to help assist new painters or even those who choose to speed up their painting process. Contrast paints are designed to base coat, shade and highlight the miniature in a single coat and most commonly used over a light undercoat. By suppling so many steps in a single application it can help a novice painter glaze over some technical steps and save valuable time going back to apply multiple coats or even colors to achieve similar effect.
The largest benefit of these paints can be used in tandem with a zenithal highlight (light color prime over a dark like the sun is shining at its zenith). Contrast Paints appear similar to a wash or shade but also appear somewhat thicker to allow for full coverage in painting the model.
While there are other companies who have created paint similar to the contrast paint, access to Games Workshop paints are widely available in my area and are considered by some to be the best of their type.
My Bias
Since the release of contrast paint in 2019 into the hobby space, I admit I’ve avoided buying and using a them. Having watched many YouTube channels during their release reviewing the product line the consensus was along the lines of interesting but not necessarily valuable to the experienced painter. You see the market of contrast paint was aimed towards the new painter as a way to do several painting techniques in one; base coat, shade, and highlight. Why would a experienced painter want to use them? An advanced painter has significantly more control and finesse doing these things the old fashioned way. As for me, why would an aspiring painter use them if it takes away from the practice of other techniques. I aim to grow not necessarily avoid tasks.
Over time however I’ve begun to notice an increase of usage of contrast paints in various applications for people. Many paint models for their games and are absolutely happy with the tabletop standard contrast paints provide. There is a growing category of people who have begun to use contrast paint as a unique tool in various situations providing yet another SKILL to use rather than a shortcut. Due to the increase in the latter I’ve decided to over come my prejudice and try them for myself.
I will also admit the that cost of contrast paint is something that has turned me off over time as well. Contrast paint can be roughly 40-50% more in cost than a standard container of paint.
My First Use of Contrast Paint
I was inspired to use contrast paint for the very first time during my woodworking deep dive color palette test. I saw several people in the painting community painting wooden objects such as doors and barrels with contrast. I absolutely loved how they turned out and asked “What was your process?” “Did you use a particular color?” The response: Contrast Paint.
Since contrast paints are commonly referred to as a “transparent filter” I loved seeing the difference in behavior using the three different undercoats: white, gray, and black. The biggest difference was noticed in the Gore Gunta Fur Contrast Paint. With a white primer the paint appears more red as opposed to brown.
I absolutely loved these colors and to be honest testing contrast myself on these tavern tiles made me excited to use contrast paint in my arsenal for other projects.
Contrast paints tested for Wood painting deep dive
My First Real Application of Contrast
After the wood working testing and not knowing how I wanted to finish painting the Hill Giant after my experiment with skin I realized that there were three areas on the Hill Giant that I technically had contrast paint for: Wood, Leather, and Fur. This was the perfect opportunity to see the contrast paints in a real application for a three dimensional miniatures instead of a relatively flat base. This distinction is valuable as contrast paints are intended to help add shade to a model.
For this test I attempted to experiment with three different starting processes to see how they responsed and behaved.
Tree Trunk: this tree trunk is mostly white but technically a zenithal highlight and would represent the most default usage of contrast paint. This would ideally produce shadow and contrast upon the addition of the contrast paint.
Fur texture: I painted a light grey color as a uniform bright undercoat to see what would happen. With a consistent color and not preshaded. This would be most similar to the white primed Gore Gunta Fur painted base from above.
For the leather I wanted to try to use two pre toned colors and see if the contrast paint was transparent enough to be impacted by the contrast paint and therefore potentially produce two variants of leather.
Hill Giant Prepped for Contrast Paint
The Leather
When I applied the snakebite leather contrast paint to the leather you can absolutely see below that the contrast paint completely over powered the under coat color of the hill giant. There is zero indication that any work went into painting the leather differently. This was by far the most disappointing portion of my testing with contrast paints. In order to fully use them the way I want to in the future I will have to learn more methods to thin down the contrast paints or mix them to increase the variety of color and tones for the paint itself.
To help compensate for this singular hue in color I did end up dry brushing and a small amount of edge highlighting to try and get more of that worn leather look.
Close up to the Leather work after Drybrushing
Fur and Wood
Applying the contrast paint to the wood and leather also yielded interesting results for me. While the fur behaved approximately as expected with darker recesses and lighter tops the wood overall did appear very splotchy. While this works very well for a tree trunk as there is no uniform color to the bark of a tree I am left frustrated in the consistency of the paint and my skill working it. I found the paint pooling in locations and not applying in a smooth layer. Again learning how to thin out the paint would be ideal.
Highlighting
At this state of using contrast paint I was largely disappointed. I know I am not the most skilled of painters but was frustrated that I could not move the paint in the direction I wanted to go and could not anticipate the results. Which is of course silly because the whole purpose of using these paints was to see how they behaved and to learn and grow.
Deciding to move forward and see what would happen I decided to apply more dry brushing and highlights to the contrast areas of the model in order to get more areas to pop and add variety of color. I added some of my original light gray color to the fur and some light brown to the tree. Overall I am really happy. I do and think overall there is much more life to the model and applying highlights yourself over the contrast paint is a necessity.
Perhaps I just need to learn more to add skills of contrast paints to my arsenal overall? What else could I have done?
Hill Giant with Highlights
Painted Hill Giant
In the end I am really happy with this model and the quality of its paint job. This is a fantastic tabletop standard piece and looking at it across the room brings a smile to my face. There is always aspects of any project you want to grow upon but in the end I think this figure is a great representation of my current skill and knowledge.
I also am really happy with the usage of some vallejo earth texture paste and a mixture of grass toughs to add final touches to the base. I tried to add the tuffs in between the rocks where grass or shrubbery would grow.
What’s Next?
While I have learned to no longer write off contrast paints and consider them a valuable tool. I definitely realize that I want to do more with them. Talking to some other hobbyists and watching more videos I realized that the use of Contrast Medium or some water will help thin down the contrast paint. I think perhaps the use of thinning down my contrast paint could help me unlock its potential. There is also different types of contrast paints. There is so much I can do and learn!
Maybe contrast paints deserve their own deep dive? Do you use contrast paints? What has worked for you and not? Lets start a dialogue to add this tool to our range of skills. How do you feel the model turned out?
Recently on my hobby desk I picked out the Hill Giant Tyrant Ogi Skullcrusher from the Lost Adventures Volume 1 Kickstarter to paint.This was largely before I decided to dive into my Frostgrave series and I decided to attempt to work towards paining some of the models that I have printed. I refuse to call it a pile of shame but rather a collection of opportunity since I am really proud of my printed model collection. 2022 I’m looking at you as a major shift towards painting my backlog (already thinking of next years goals).
Hill Giant Printed Model
One of the things I wanted to do and focus on with this model was to set a baseline for myself and figure out what kind of questions I had when painting skin on models. You see in the past I have almost only used a flesh skintone paint and a wash in the past and call it done. This results in a glossy dirty finish of my miniatures. You can see the image below of some of my past painted models (2018-2021). Some of these represent models that I’ve painted perhaps only 20 miniatures ago (took a long break in 2019-2020) this does not include any of the terrain and building painting.
Previously Painted Figures
This collection showcases two 3D printed models and 3 figures from Reaper Bones. Other than the lack of depth of expression, and in the case of the bugbear on the far right any facial features painted what so ever. You can see I have quite a long way to go for improvement.
Other observations I can draw from these are a few things.
Even though I have painted very few models I feel as if my skill has grown tremendously
The skill sets and tools I have at my disposal for painting miniatures have grown.
So it is the perfect time to attempt to gauge my current baseline of skill for painting skintones. As I want to document my growth in the hobby more and current understanding to watch my growth of long period of time these baselines are incredibly helpful. I also attempted to dig more into contrast paints, how to use them and expectations of the paint but there is enough there that I am going to release a contrast paint deep dive part 1 from this model next Monday!
The Research
Around the time I really wanted to do more research around painting skin I was listening to a fantastic miniature painting podcast. I love to listen to and highly recommend: Paint Bravely the Podcast. In their July 5th episode “The Best Primer is NOT Black, White, or Grey” they discuss that using a red brown primer on models is great on showing the blood flowing through the figure. It is incredibly rare not to see a red or rosy hue on people of skins somewhere.
I also watch Squidmar Miniatures youtube and keep going back to one of his “Professional Painting Secrets – Squidmar Masterclass”. I have continuously watched the first 20 minutes of him painting the muscles of the bust. I really appreciate him breaking out into photoshop and explaining more about muscles. However in some ways I am still confused (more of that to come).
Regardless, this is a great spring board for me starting to do more.
The Inspiration
Now that I have more knowledge as to the mentality of painting skintones the second thing I struggle with is what colors to use. However as I was going through the Shadowfey Kickstarter updates for my Frostgrave buildings I noticed that they included a painting guide for the giants they released. I used their guide as the initial color reference and found paint similar in my collection although not perfect (thats ok).
Printable Scenery’s Giant used as inspiration
Paint In Progress
Using the Printable Scenery guide as a starting point I used paint conversion charts online to attempt to get as close as I could. The largest challenge for me is that I did not get a large chunk of time to paint and constantly had to remix the same tone since my workspace can dry out my wet pallete if i’m not careful and its been incredibly dry lately. This is when my paint journal came in really handy, I would commonly paint small squares next to my “official” mix to see how it compared before placing on the model. If you don’t keep a paint journal I highly recommend it. You can actually see all my “test” mixes next to the original as tiny dots clustered around a main one. I really struggled with my mix when I started using Elf Skintone.
For the very first base layer I used Citadel’s Deathclaw Brown, Terracota & Scarlet Red from Vallejo Game Color. I attempted to mix it so that way it had a strong red brown tone and after painting it on the model I actually really loved it. It felt like I already had great variable of the skin tone and a color I really appreciate.
Layer 1 (Mix #1): Deathclaw Brown, Terracota & Scarlet Red
I then used this layer and mixed in more Deathclaw brown to lighten it up and painted on top. This was the beginning of my first area of confusion. Watching the Squidmar master class it showed that I was supposed to paint the lighter tone into the muscle recesses and use the dark I believe only for the underside of the muscle. This is what I attempted here but do think it was the beginning of just “dark in the recesses” painting behavior.
Layer 2 (mix #1): Mix #1 + Deathclaw brown
I began to then continue building up and attempt to slowly paint less and less on the model to give it a better transition. This time my mix included the Vallejo Game Color Elf Skintone
Layer 3 (mix 3): Mix #2 + Elf Skintone
I then built up two more layers and the 5th layer was barely applied.
Layer 4 & 5: Elf Skintone & mix of Elf Skintone and Beast Hide
At the end of the skin I was torn on using a wash and for the sake of this experiment I decided against using a wash. Perhaps it would have lent itself to more depth? I have been attempting to improve my skills with layering and am finding myself using washes less on my paint jobs. I will definitely need to back to using shades and washes and attempt to use them in more sophisticated ways.
There was definitely a small bit of painting fatigue due to the number of painting sessions this took, getting large chunks of time to paint is really hard with small kids. While I would have liked to put more time on his skin I was happy. Also the six foot rule for how it would look on a game table told me it looks awesome enough to play with. The one benefit there is that the more definite and darker muscle is visible across the table and showcases him well.
Quick Reference
One thing I made for future reference was a handy quick reference of my layers, its overall transition, and ratios of paint mixed in my painting journal. I actually really loved how it came out and let me know if this would be useful for you and if I should continue to include my reference guides.
Hill Giant Skintone Reference Guide
Painting After Skin
After I finished painting his skin I still felt the need to experiment. The first experiment that I did was to see how I felt about using a blue linen or leather on his waist.
After throwing on some paint I realized it was absolutely not what I wanted on my model. Also thanks for the conversations and ideas from the 3D Printed Tabletop Discord.
I decided to revert back and paint his clothes a classic leather color. I wanted to showcase two colors of cloth with a reddish fur. So instead of trying a new color I decided to try some of my contrast paints which I do not have as much experience with. However II think a conversation about my obversions and questions around contrast paints deserve their own separate discussion, stay tune for next week on that!
Areas of Improvement
As for the skin there are definitely areas where I feel like the darker recesses on the model are too thick and transitions too short. I feel as if I should have had more visible transitions. Several of my middle layers such as #2 and #3 are not nearly as visible.
The lighter color paint and layers definitely overpower the red hue of rich living flesh I was going for. While I did end up with a Caucasian skintone it was not as rosy or red hue as I wanted. This made me remember at the very end that I should have used more of a glaze of thinner consistency which would help the transistions as well.
Lastly I realized I have no idea how some muscles of the human body actually work. For example I had no idea how to appropriately paint his back and hands. You can see that the transitions in muscles are very thick, not as well definite and look kind of goofy.
In progress shots of back and hand
Finished Image
While I do admit I need to take more photos of this guy I am extremely happy with his final result. Check it out and let me know what you think. Biggest highlight is that these are probably the best eyes I’ve ever painted.
What’s Next?
I definitely want to continue focusing on improving my knowledge and experiment a whole lot more with different skin tone colors and also increase the amount of diversity in my models. Learning more about the skin of different people around the globe is going to be a ton of fun and I want to see if I can truly capture peoples heritage in color.
Next step in this experiment is my testing of different base colors for undead flesh before I paint models for the Necromancer Warband.
As my regular readers would know I have been working towards printing 100% of the models from both the Lost Adventures Volume 1 and Lost Adventures Volume 2 Kickstarters. I have always been a fan of the magnitude of models and variety of terrain and miniatures that come with each project and at such a great price point. However my absolute favorite thing is that this is one of the best collaborations of artists representing the sculpting community for 3D printing in the tabletop space. It is a fantastic way to get a taste of the talent that is out there in the community if you are new to the hobby for your games. I have discovered several of my favorite artists this way.
What may not be as common of knowledge is that I am a volunteer test printer for the past three Kickstarters after they were looking volunteers after the original Lost Dragons Kickstarter in 2018. I of course offered my services and have been helping the gang there ever since. I have immensely enjoyed getting surprised each time I print something new as I have no idea what i’ll be asked to test, the size of the model, or what it even looks like. Talk about fun, it is kinda like Christmas.
Well the time has come! The newest Kickstarter has officially launched! Check out and show them some love, while unlocking some of those juicy stretch goals! If you want to see some of my personal experiences with a few of the modes thus far read on!
In honor of the newly launched Kickstarter I thought i’d share some of the models I tested that are coming with the Kickstarter. Make sure to follow the blog and check back on the homepage for links to the individual printing logs which include how long it took to print and total cost of each print. I also add assembly information along with the profile settings for my prints if you have any questions on how things are put together.
Lost Adventures Volume 3 Model Preview
Disclaimer: Let me preference this to say that I am not affiliated in any way with the Lost Adventures and am merely long time consumer who has participated in some of the test printing for the various Kickstarters over the years. I am however a major fan of their products and have been given permission to post my print data and logs like I would other models coming off my printer. I am a big fan of their work and am merely writing this to express my excitement about the project and sharing that with my readers. Models shown below may not be their final form as they are actively in development based on testing feedback and the discretion of the Lost Adventures Co.
This Kickstarter is unique in that it is broken up into eight “Core Collections” of models all based on areas in or surrounding the GreenSea, a region featured in Lost Adventures Volume 2. A Core Collection could be purchased for $20 in this Kickstarter if you are merely interested in just one area. Therefore I am going to breakdown and organize my prints into their Collections as I have no idea how these will be bundled and sold in the future.
Blasted Isle
Fire Elemental
For the The Blasted Isle i’ve had the pleasure of printing just one of the Fire Elementals that are available in the Kickstarter. This sculpt is so much fun and incredibly easy to assemble.
Figure is on a 75 mm base and is roughly 5 1/2 inches tall.
For the Heart of the Greensea I have had the pleasure of printing some adorable baby monsters and a Clay Golem. These were done on my Prusa Mk3s FDM printer as all miniatures are tested in both FDM and Resin. Periodically I’ll test in either as the need arises. FDM Print Profile and Support Settings.
Baby Phantom Panther
Clay Golem
Baby T Rex
I have also printed one of the swamp trees from this collection. I can honestly say i’ve never had a swamp tree in my rapidly growing list of terrain but now I want more and can’t wait to add draping vines to this gnarled tree.
Below are the models that I tested and printed for the Kobold Coalition. While this is only a mere sampling of what is in store for the Kickstarter this sampling has some of the best character and storytelling i’ve ever had in a set of models.
I think my absolute favorite models so far are the Kobold collection! These kobolds are unlike any other kobolds on the market. I absolutely love the scale of these miniatures as they still represent small races but are not too small that they are a pain to paint such as my reaper kobolds (which I’ve never finished to this day). These come with so much storytelling that I’ve been seriously contemplating my first ever diorama to feature them. One key element about these Kobolds mirror the growing sentiment I commonly experience playing in 5th edition D&D which is humanizing monsters. These Kobolds are humanoids much like elves, dwarves, halflings etc. They have jobs, families, kings and entertainment. Is it right to just take a party into a dungeon and wipe them out completely?
Creating a town for these Kobolds for my players to explore will only further tug at their heartstrings as to what to do with these tiny creatures. Or perhaps Kobolds will start to become part of culture as minstrels, bartenders, town guards, etc. I see so many uses and varieties for them.
I also find it interesting that out of the now four Kickstarters done by the Lost Adventures Co, three have contained a different variety of Kobold. Is this a growing trend? Is the race of Kobolds going to continuously grow in variety each Kickstarter? I really hope they do because I’m absolutely loving their unique nature. Example: Fey Dhok Kobolds from Lost Adventures Volume 2, which appears to have more coming in the Heart of the GreenSea models!
While testing these models I’ve printed the set in both resin on a Phrozen Sonic Mini 4k as well as my FDM Prusa mk3s. Feel free to check out my FDM print and support settings.
If you are going to make a splash with a massive storytelling model why not capture the king of dinosaurs and use it as your personal mount? The Trex with Howdah not only has inspired my imagination but is also one of the absolute best keyed model i’ve ever assembled. You can tell the Lost Adventures Co is only getting better and better and delivering fantastic models to your tabletop.
To be absolutely honest i’m terrified of being able to paint this model and do it justice.
Also one great thing is that you can choose if you want this T-rex with horns or without Horns as it currently comes with two variant heads.
Catapult
Now we have kobolds in barrels for protection why not also include their own personalized siege. The Trash Guard has come prepared. Why not sling kobolds from a Catapult? This model is so much fun as I imagine the Kobolds in Barrels hiding as they fling themselves over the ramparts of a castle to invade it. Or perhaps it is merely a form of cultured enjoyment like a Ferris Wheel? No matter what I’ve really enjoyed printing and assembling this model.
In this collection i’ve only FDM test printed one of the laborers which unlocked as a $160K stretchgoal. This halfling character is a lot of fun and super easy to print.
Last but not least I had the chance to print a bit of the Moonlit Mountains. This icy terrain looks absolutely incredible and am really excited to paint up the pine trees I tested printed for my upcoming Frostgrave board i’m planning.
Also did I mention that there is an arctic owlbear!?!?! Although we haven’t quite talked about this yet on the site Owlbears are my all time favorite Dungeons and Dragons monster. I have been excited about arctic owlbears ever since I read the “Ecology of the Owlbear” article in Dragon Magazine from 1995. So happy they have become a thing again with and the Icewind Dale campaign brought them into 5th edition however I have yet to own a model. Now I do!
Pine Tree
Arctic Owlbear
Conclusion
Even though I have had only a small taste of the Uncharted Lands Kickstarter currently live I am really excited about what I am seeing. Of the past Kickstarters to date, Lost Adventures Volume 1 has been my favorite as a catch all of anything id need on my game table. However this one might surpass as a favorite due to its wide diversity of different terrains and file types. I am not someone who would normally back a campaign over just a small biome like underwater, frozen, desert, etc. This is because I have so little campaign or content in those types of regions. But as a bundle of a variety of biomes I can’t miss this.
If you want to see more of the various test prints from this Kickstarter check the imgur links on the Kickstarter page to see what the other testers have been able to produce.
Can’t wait to see what else is in store and I’ll be sure to update my print data as I can.
Is there anything you are really excited about? Do you have a favorite print? Let me know in the comments down below.
For 2021, I decided to paint a “Benchmark” of my skill growth for the year. The goal is to see the before and after of how I have developed as a painter. This year I decided to paint a model from the Hold my Dwarf kickstarter set. This duel wielding swordsman, from the Solider Set 5 collection, contains several aspects on what I really want to focus and improve upon on for the year. The areas of desired growth and questions I ask myself are listed below.
At the end of the year I will print another version of the model and paint a new model and talk about my personal growth. I am interested and excited to see where this experiment goes.
Aspects of Desired Growth
Fur: Can I learn to paint fur better that it could even dictate the type of animal it comes from? Potential area to improve skills and knowledge in drybrushing?
Armor: Methods and ways of painting True Metallics in miniature figures. Can I make armor shine? What are the different types of metals?
Weapons: How do I make metallics & weapons look more battle worn and dinged?
Skin: Starting completely from scratch. Largest desire is to have growth and variety in skin tone for my miniature collection.
Hair: Much like skin I have not put much effort into growing or researching this area in miniature painting.
Clock: Layering and contrast. Can I improve my layering? Make smoother transitions in blending the layers? What methods & techniques work best for me?
Technical aspects I seek to improve upon
Improving Brush Control
Zenethial Highlighting & Source LIghting
Basing. Can I make the miniature tell a story
Adjacent Goals
Improve my miniature photography.
3D Printing the Figure
Can I improve the state of the print itself?
Methods to improve post process clean up
Note I did break a hand/weapon joint and had to use green stuff to clean it up again
Progress Photographs
Final Photographs
Overall I am happy and satisfied with the display of my skill for this model. I have several things that I am frustrated on such as lack of choice in hair color and knowledge to create better more defined skin. I also would like to learn how to do gems/crystals for the sword hilt. I am really happy with the little detail in the green pouch and have received several comments about the swords being a key point of enjoyment.
One interesting comment which I think could lead to a great study or discussion on personal preference was the feeling of the figure being too “clean” as in not adventure worn enough. Adding dirt and grime to the model could give this dwarf a more warrior feel.
Paints Used
Also apparently as a goal for the year I am going to improve my formatting on documentation of paints used. I mean this is a thread on improvement right?
Continue reading to see how I grew in miniature painting a year later!